All Posts (1994)

Sort by

Pickup covers

9353748080?profile=originalI love brass all nice and shiny.  Here is a completed prototype of my version of the Thin Pickup.  This is one of a few sizes I ended up designing.  This one is wide enough for a 6 string and measure in at slightly over 1/4" thick.  For my typical builds, it is not a problem mounting this on right on top of the box.  Like this one.

9353748495?profile=originalThe bobbin is notched out so that the lead wire can be run through a small hole at the bottom corner of the pickup. A better detail is below.

9353748277?profile=originalI started with sheet brass that I picked up at the hardware store.  I got two thicknesses .010 and .016

9353749457?profile=originalThere is an advantage to using the .010.  If you don't have a bender or good strait metal shears, the thin brass is easy to cut on a paper cutter or even heavy duty scissors. I used a paper cutter for the thin stuff and a pair of strait sheet metal shears for the thicker material.  I use the same paper cutter to cut the fiberboard I use to make the pickup bobbins.

9353749095?profile=originalI have found that if you are going to do something over and over again, the thing that helps best is a pattern.  I like to draw everything out so that I can print as many as I need.

9353750083?profile=originalThe other tip I have is my use of Elmer's repostitionable glue.  It's like post it note glue.  Sticks to the piece while I lay it out then peels right off.  This is the .016 brass so its the tin snips to cut this one out.

9353750469?profile=original
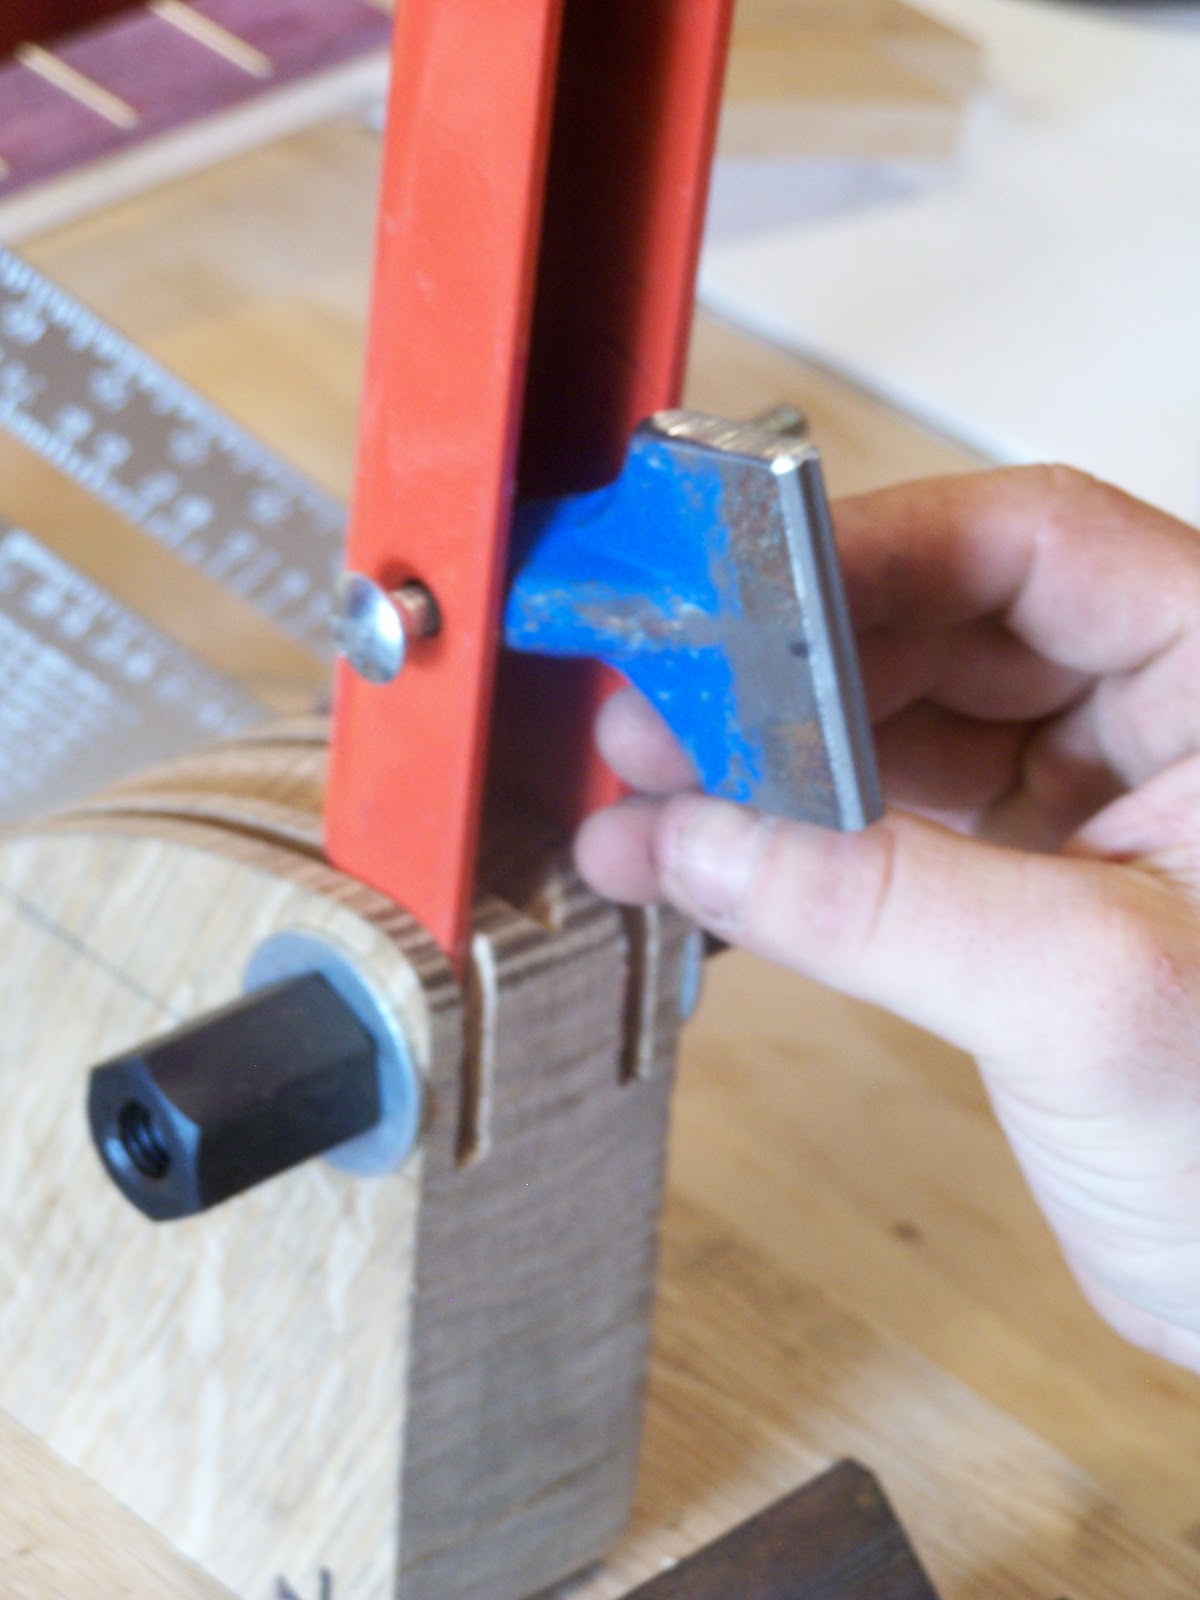
Cut then bend.  I used to use a variety of pliers, vise and jigs to perform my bending tasks but recently picked up this Grizzly 12" pan and box brake.  Very handy indeed.  Now I get nice crisp edges to my bending work.

9353751058?profile=originalOne more bend and this one is ready for clean up and polishing.

9353750873?profile=originalThe Nickel Silver I ordered isn't going to be in till next week so I had to make all the prototype covers in Brass.  I'll post an Album on my profile page once I get the Nickel done and install a few into some instruments.

Read more…

Fret Scale Template-Accurate! Cheap!--How To Make

  Here's my first CB building blog. It's just a short one to get the hang of it. It's about making an accurate fret scale template for about 3$US as opposed to buying one for 40+$US. It has sub-millimeter accuracy with just a little care taken in its making. First, you need a 3$ 'Swanson' yardstick from Lowes i.e. (http://ity.im/07nkn). Of course it can be another quality brand from somewhere else as long as it has mm marked its full length. After completion of the template, it can be cut back to wahtever length you really want, the one in this blog and these pix is for a 30" Bass Scale. I like the 'Swanson' brand, I've bought 6 of them so far and have found Zero visual difference between any of them. Accurate enough I think. My frets and intonation come out near perfect so far after 23 builds.


On to the actual 'making':

9353744268?profile=originalHere you see I have the stick clamped against a board on my build bench.

9353744691?profile=originalI support behind the 'stick on each cut and 'guide the saw straight with a small block of hardwood.

I am using an Xacto saw blade.

The 'stick is aluminum and does not hurt the blade much.

I've used this blade for 20 years or more for wood, aluminum and brass.

9353745282?profile=originalAfter cutting the notches to about 1/8" or so (doesn't matter as long as you can see them) I highlight the marks in red Sharpie. I check and double check against my fret table (I use mm for frets) before each cut. I try to get as close to .5mm or .3mm or .7mm as possible when cutting between the full mm marks. I have created a plastic 'slide-guide' that is cut out the thickness of the 'stick on one side to help with parallax error since the 'stick is pretty thick.

9353745090?profile=originalHere you can see how the plastic slide-guide rests on the 'stick and on the fretboard itself.

9353746265?profile=originalThe red marks are easy to find and the little slot acts as a natural stop for the slide.

9353746095?profile=originalBut I find this to be the easiest method. Flip the 'stick over!! The 'stick is plain on the back! Straight and smooth!

I find my next slot with the Xacto #11 knife,

9353746875?profile=originalSlide the guide up to the knife, then

9353746675?profile=originaldraw the blade out of the slot on the 'stick and along the guide for a great, thin, easy to find fret position mark.

After all the frets are marked, I put the Xacto blade in the knife mark and slide a small 4" square up to the blade and mark a line all the way across the fret board for the fretsaw to follow. The saw follows the knife blade mark very well.

9353747298?profile=originalJust an overall shot of the simple to make and best of all CHEAP $3 fret scale with sub mm accuracy!!

Best of all, since they are only 3$, you can make a different one for every scale, 25 inch for guitar, 13-15-17-20 inch for ukes and 30-34 inch for bass and still  have less than 25$US all told! Way less than one scale template from a luthier supply store and way better than a printed paper template. I can mark a 20 fret 30 inch bass neck in about 30 seconds now with real good accuracy and total repeatability. And since there is a spare edge the 'stick could be used for a second scale but I like a separate 'stick for each scale to keep from confusing myself (pretty easy) and since they're only 3$US how can you go wrong!


Hope this can help some of you builders out there, especially the newer ones who haven't figured out all these handy tools and jigs that help us build better!

All comments welcome and anyone with a suggestion to improve this type template or this blog, please jump right in and share with us all.

Thanks for looking my blog over.

DrByte.


Read more…

The other day my dear wife Jan set me a challenge.

The challenge was to build a Cigar Box Guitar in one day.

The conditions for this challenge was to build one from bits that i already had in my workshop,nothing posh, a none fuss box standard Cigarbox Guitar.

Its was like a red rag to a bull.......

So 11am -ish  on Wednesday the 16th of March 2011 i set about the Built.

Got a box .... check

Got a neck....check

Tuning pegs .... few oddments.....check

strings..... check

Coffee...oh yes...Coffee ...Check

I was ready for the Build..............

At 5:10pm Jan came into the workshop.....................


at that moment I`d Just finished tuning the guitar up!!

Yes id done it one Cigarbox Guitar in 6 hours-ish.

9353742860?profile=original9353743463?profile=original


Read more…

Lost My Voice in Atlanta

Earlier this week, I was in Atlanta for Pittcon.  It's the largest conference for Analytical Chemistry in the US and although attendance isn't what it once was, its a big deal for many companies, mine included.


As I was speaking with punters at my company booth on Monday afternoon, I noticed my voice getting a bit rough.  By the time I got back to the hotel that evening, I didn't have anything above a whisper.  Tuesday, nothing.  Wednesday even less.  Either someone slipped something in my coffee, or my voice self-ejected and is wandering around the Georgia World Congress Center trying to find a new home.  I hope it isn't in that cute girl across the aisle from our booth.  I don't think it would suit her well.


I'm not-so-secretly hoping that when I find my voice again, that it would be a mean Tom Waits gravel growl.  Today, I tried speaking in a normal volume and it is almost there.  I could almost get out "The Piano Has Been Drinking."  I'm afraid that it will be the sort of temporary thing that doesn't last long enough to be useful.


If anyone in the metro Atlanta area sees a voice wandering around, picking up loose change and begging for some bourbon, tell it to turn it's arse north and get home. It is probably better that I don't try to sing, but I've got a business to run here and it's tough without use of the phone.

Read more…

Thin Pickup (part 2)

A fairly productive day.  I got one of my favorite standard CBG builds completed for use as a test platform and wound a few variations of my baseline design.   I picked up 4 different magnet sizes and so far have experimented with 2.  So far I've wound 7 different coils ranging from severe under wound to slightly overwound. 

9353739262?profile=originalIn the above picture I used a small square of copper tape as a solder base for the thin wire and my jack cable.

Below is the test platform.  It a pretty strait forward build geared toward electric rather than acoustic output.  No sound holes and the top of the box mates up tight against the neck underneath.

9353738891?profile=originalAfter a bit of set up, it is ready to play.

9353740267?profile=originalA bit of gaffers tape along with a temporary bone bridge and its almost ready to go.  The action is still set a bit high but I'm not going to attempt any further adjustment until I fabricate a final bridge assembly.

9353741260?profile=originalThe last set of pickups I built today started with a smaller magnet 1"x1/4"x1/4".  The first one I under wound to just over 2500 turns.  Output was somewhat weak but not as low as I might have imagined.

I put a penny on top as a reference so you will get an idea as to how small it is.

9353741655?profile=originalI've wax potted two of the pickups I liked the best and have the larger one installed and playing.  Decent, solid bass performance and a bright top end.  I would like to be able to get just a bit more distance from the strings to see if where the high end settles down but not with this instrument.

This week, I'll try to record and post some clips both clean and overdriven. 

Read more…

Thin pickup (an open source post)

Like many, Shane's post/challenge put my creative side into overdrive.  I had made some attempts at a thinner pickup but really didn't like the way my experiments turned out.  A lot of time and learning has passed since these early experiments.  What I have learned in the last couple of years has to do with why some parts of pickup design just doesn't directly translate when you make them smaller.  There are a bunch of reasons that a 3 pole single coil pickup wound with the same number of turns, same magnet and wire just doesn't sound quite like its larger 6 string version.


So I rolled up my sleeves and went back to do some research into the style of pickup that Shane outlined in his video.  After that, a bit of searching for materials and then some calculating.  What I decided was to go with C5 ceramic magnets and 42 gauge heavy build wire.

Here is the quick drawing I put together that includes the bobbin and nickel silver cover template.

9353735673?profile=originalAs to the bobbin material I used .020 vulcanized fiberboard I purchased from McMaster Carr.  This made the pickup .010 thicker but the .015 material I tried just wasn't stiff enough.  I cut the material and trimmed and sanded the edges so the wire would be less prone to getting caught.  I also used a wet stone to grind the sharp corners off of the magnet.

9353735294?profile=originalA quick little bit of super glue and the whole assembly goes together really quick.

9353736264?profile=originalOne benefit of using this thin forbon type of material is that the bobbin will just be held in place by the magnet to the steel platten on my winder.  No double sided tape needed.  I just used some blue painters tape to hold the starting part of wire in place and I was ready to wind.

9353736074?profile=originalHere is the wire I used.  I got this spool as surplus.  I use it in place of some of my more expensive wire when in the prototype stage.  Not that it is much different than what I normally use, I just don't feel as bad when I have to trash some of the early work because the wire was cheap.

9353736482?profile=originalThe second coil is done.  The first one was done with a bobbin that was cut slightly oversize so I could confirm max number of turns first.  This second bobbin was 1"x2" and was wound to just over 4600 turns and has a DC resistance of 2.7k.  Just to put the size into perspective here it is place on a standard business card.

9353736895?profile=originalI used a couple of small squares of copper tape to solder the wire to a wire lead and tested.  Then soldered the lead to a 1/4 jack and went about seeing what it sounds like.  This is all pre potting at this point but overall, the pickup has a decent sense of balance with bass and top end. 

9353737668?profile=original

I taped it to a folded index card and slid it under the strings of my favorite 4 string.  Overall I like the tone.  I'll need to wax pot it and then find a better way to install it into something before I attempt any loud volume or distortion.  That said, I am pleased with this early build.  Keep in mind, I find it harder to get good clean tones I like than overdriven and this one has a nice clean sound.

9353737880?profile=originalHere is the list of materials.

.020 vulcanized fiber board    McMaster Carr

.375x.250x1.5" C5 grade magnet   All Magnetics

42 gauge heavy build wire   Surplus Sales of Nebraska


I've ordered nickel silver to make covers.  I'll post picture once it comes in and I get one done.

Read more…

Papa's Boxes not currently fulfilling orders

I just recieved this email from Papa's Boxes today after I emailed them a month or so ago. I wonder what issue it is they are having?


Hello,

Thank you for your email and your inquiry into our products.  We are not able to fulfill any orders at this time.  Please check back with us in early May as to the availability.  You are correct that the availability has been out of stock since late last year. I am sorry for any inconvenience.

Thanks, Ilene

Read more…

Acquiring more tools...big style

Well, I've bought a pretty serious tool...a 12" Record bandsaw! Got it from eBay at a good price. I'd been looking at prices of new ones, but for a decent sized one they were out of my budget..and seeing as this is pretty much the same one as JuJu has I thought it would be a safe bet.  It needed a bit of work to get it running right..a new bandwheel tyre and a new blade, but for half the price of new I reckon it was a good buy. It's already proving its worth, as tedious jobs with a handsaw which were physically hard work jobs such a cutting a taper on a neck or cutting the notch out of a thru' neck where it goes under the top are done in a matter of seconds.


It's perhaps more kit than I really need, but inevitably with this sort of tool, you'll find it capable of doing some serious work that you perhaps wouldn't have even considered without it. For example I can easily re-saw 3 inch hardwood to make fretboard blanks..a job that I really wouldn't have entertained doing by hand.9353734672?profile=original

Read more…

Here comes the sun

  Spring time is just around the corner and it couldn't come at a better time. This winter has brought our area a mountain of snow...nearly a storm per week since Christmas 2010. While my family spends lots of time outdoors sledding, walking, and more during the year's darkest days, I am quite ready for warmer, longer days.

 Of course this means I will be busier than a one armed paper hanger with the crabs...but who can complain? At least I don't have crabs...haaa.

 Gardens will need to be tilled, raked, dibbled, seeded, watered, weeded, watered, repeat...until the golrious days of harvest. Farmers markets, bountiful food, and warm sunshine...gotta love it.

 CBG building will likely take a seat on the back burner then, but the prospect of next winter seems not so bleak knowing I have the workshop, cigar boxes, power tools, and my imagination waiting for my return.

Read more…

My first cbg

 Greetings everybody, I'm getting ready to build my first cbg. Just starting to collect my parts. It will take a while to build it. I want to take my time so it will look and sound ok. When finished I will post a picture of it.
Read more…


Once i sanded my fretboards how i like them I pressed and trimmed the frets

The pictures tell the story. I used to hammer the frets in  but that was a pain in the ass so I made this press. and Also made a few blocks and shims so I can press all the frets up to the high end.notice how I turned my kitchen table into my workshop. this makes my wife so happy.....not.        


dig the blurry pics

100_7174.JPG

100_7177.JPG
I use a pair of flush cut nippers to trim the ends close so i don't have to file so much.


100_7178.JPG

100_7179.JPG


Brick chisel. I layed about a million bricks in the front of my house with this in it's first life.
100_7181.JPG

100_7183.JPG

100_7184.JPG
Read more…

After I cut the frets I am ready to bevel the back sides of the neck on the bandsaw following some guide lines. the neck in cross section will look like the picture below.
  SDC10512.JPG
I mark the neck .4 from the bottom and draw a line the whole length of the neck (lines with arrow indicators are the two cuts. if you study the next two drawings you'll see what I'm talking about. Cut 2 actually will be done first (don't ask) and the bandsaw will be set at 90 deg. then cut 1 will be done second and the bandsaw will be set to 45 deg.


SDC10521.JPG


SDC10523.JPG

SDC10526.JPG


SDC10542.JPG

SDC10543.JPG

SDC10545.JPG

SDC10547.JPG

SDC10549.JPG

now that I beveled the back the neck will sit nicely in the vee blocks on the fret press. but first I glue on the ears so we have enough wood to make the shape headstock I want. you can put them however you want for the shape you need. I put wax paper wherever the glue will squeeze out and don't worry about over seepage, I can just sand that right down with the palm sander. The ears also strengthen the first (center) joint.
SDC10553.JPG

SDC10555.JPG

SDC10556.JPG
Read more…

Now I am ready to mark and slot the frets. I square up the nut slot with a nice square file and clamp a dummy nut in to measure from so there is no guessing where I'm measuring from. I charted out my fret distances on a piece of paper and marked the neck with a nice sharp pencil. Mine is a 24" fret scale.
SDC10457.JPG
SDC10458.JPG
When I was visiting my in-laws down in Georgia my Uncle Tommy gave me this cheap harbor freight pull saw that just so happened to have the exact blade thickness I needed so  I tossed the crappy handle and since it was so wobbly, I added two side rails to it for straightness and stiffness. I also mounted the side rails on the blade to coincide with the thickness of steel guide that I have been using. I mounted the guides so once resting atop the fret guide the teeth will only penetrate the fretboard at the depth i need. This makes it easy not to screw up the slots. Guide is just a piece of rectangular tool steel that I recieved  with this old Mill I had. I used to use it as a spacer for clamping and machining. I squared off the end to a perfect 90 degrees so that i can just use the long side to line it up with the fretboard and the front edge will be square. Sometimes I press a piece of wood against the side of the blade that's showing to guide and start the slot. then its a matter of how accurately you marked your slots and if you can cut exactly on that line. The pencil line width is just about the same size as the blade thickness so I just clamp the guide so that I can see the whole line and nothing more. Try not to ter up the side of the fretboard.

SDC10459.JPG

SDC10460.JPG

SDC10465.JPG

SDC10466.JPG

SDC10471.JPG

SDC10474.JPG

SDC10475.JPG

SDC10476.JPG
Read more…

Home Made Fret Press

I made this fret press and thought I would share it before I finish the neck making posts. I need to fret three necks so I broke down and made this press. It features 2 inch thich quarter sawn white oak. The whole unit is 21" long by 7-1/2 wide and weighs about forty pounds or more. I used a brick chisel for the press head. first I flattened and shaped the face of the chisel to accept the groove and then I ran a zip wheel over the face to get a groove to guide my file and finished the face with a small round file. The handle is I think from a snowblower or something. I said to myself, "one day I'll use those", and low and behold I used one. 
The rest is just drilling and shaping and bolting. not as easy as it sounds. for now I use vee blucks to hold the necks since the necks come off the bandsaw with a perfect beveled back, but I can easily make a block to hold fully shaped necks. It works like a charm and is much easier than hammering frets. You do still have to hammer in some of the higher frets though.

SDC10561.JPG

SDC10560.JPG
SDC10562.JPG
Read more…