All Posts (1994)

Sort by

I'm releasing this under the Creative Commons License - Attribution Non-Commercial Share Alike (CC BY-NC-SA) 

BB77A14F-6EE0-49BE-B0CA-496360D784FB_zpses4swsz0.jpg?width=640

Why build this winder?

Cost vs performance for starters. Features for another. Want to push your decision over the edge? You can build this winder for $158.00 and have a whole lot of machine for very little investment.

One of the lowest cost and most popular "Pro" winders is $462.90 and it only has a counter; no tach and certainly no autostop. You'll also need to align and tape your pickup to the front of it with carpet tape. Check it out for yourself.

Basic idea and cost breakdown

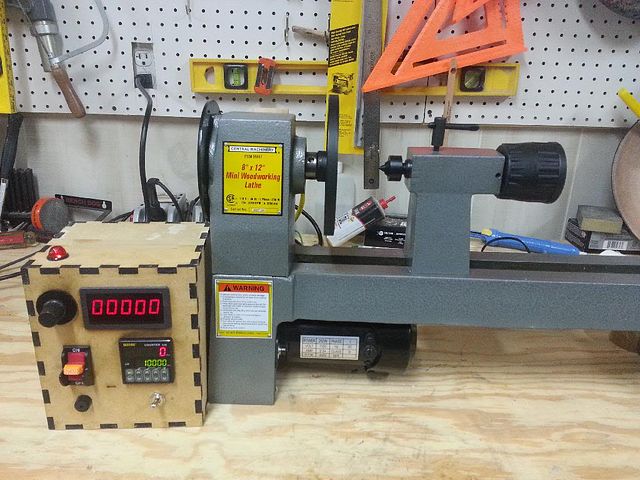
Why a lathe based winder? Safety, speed and superior winds. The lathe provides an ideal turnkey winding platform with the addition of some industrial automation components and a little know-how.

The tail stock of the lathe positions the pickup precisely on the winding plate and holds it in place securely without the need for carpet tape. There are no worries of your pickup flying off the tape and embedding itself in your face.

I've wanted a new winder for awhile, and figured I could make better than I could buy, and do it for cheaper. I reused everything I could from the basic lathe and used off the shelf components to keep this simple and inexpensive. You just program the number of turns, press go and let it rip while you guide the wire. I don’t see the need for an auto traverse, so I didn't make one; I like scatter wound PUP’s.

I wound my first pickup in 1986 - this winder incorporates everything I've learned since then and has all of the things I wished all of the other winders had :-). What does that mean? ... it means that it's a stripped down gas can built for speed and it's meant to scatterwind pickups on a professional level. It will wind a pickup in 1/4 of the time of the store bought commercial rigs based on the Schatten design, and it will wind a truer pickup. It will also get away from you and make a clown wig of your expensive wire in that same amount of time as well. Start slow and work your way up to quicker winds. The payoff for your practice? Faster winds produce tighter coils with less microphonics and you can fit more wire on the bobbin if you need to.

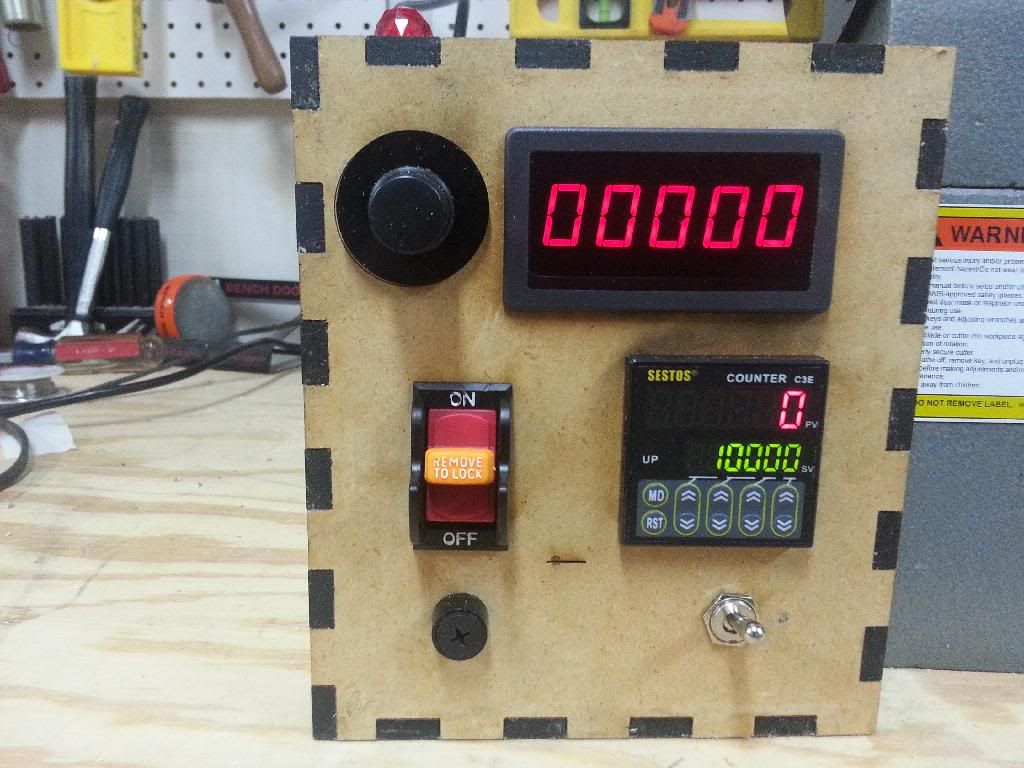
I also added a forward and reverse switch for CW and CCW operation so you don’t have to flip the pickup over to do a reverse wind – you can even wind stacked humbuckers without removing the pickup to switch direction between the upper and lower coils.

Most parts can be sourced from Ebay or Amazon (Ebay turned out to be cheaper); just search these descriptions – 

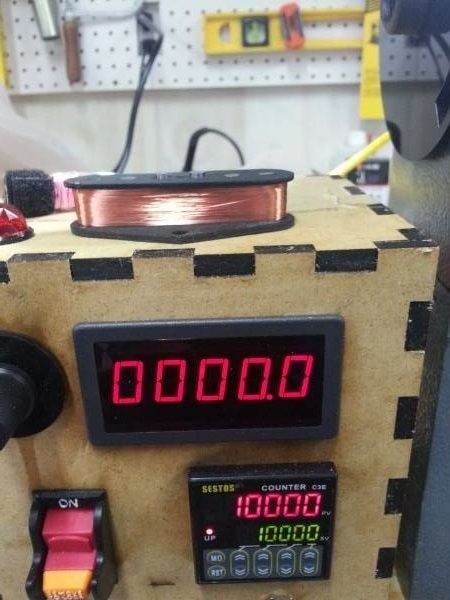
Tachometer - 0.56" DIGITAL Red LED Frequency and Tachometer Rotate Speed Meter DC 7-12V 

Preset Counter C3E-R-220 - 110V 220V 6 Preset Digital counter 10KPCS Relay
(get the 110v - 220v relay version, 12v - 24v version will require an additional 12v power supply)

From Radio Shack - DPDT center OFF switch
This source is just for convenience, just get a DPDT center off switch with spade logs.
Neon Lamp
Again, get what you want, 120V will be the easiest to use. 

The following parts are from www.sparkfun.com
Photo Interrupter GP1A57HRJ00F Breakout Board

Photo Interrupter GP1A57HRJ00F

Resistor 330 Ohm 1/6th Watt PTH


Opto Interrupter Disk

For those who would like to make the winder but might have trouble making the opto interrupter disk... here's the file in a format ponoko.com likes. Just upload it to them and they'll cut you one. 


Their current pricing to make if for you is $5.33, so not bad at all. Make sure to specify these options - 

Acrylic - Black
3.0 mm
P1 - 181.0 mm long x 181.0 mm wide
Making: $1.83
Material: $3.50
Total: $5.33

6605FB24-D62E-4EDC-9FE4-B8847914DA48_zpsqsnilx9e.jpg?width=640


Schematic and control circuit - click to open the PDF - this is the layout to use if you're using the Harbor Freight lathe as your platform. 

Theory of operation

Note:This is here for those that are interested in the how and why; it's not necessary to understand this section to build the winder. Also - this is rather conceptual in as much as the a low voltage relay is built into the counter already. You would only need to add an external relay like this one if you need to switch a large current load directly... a motor for example. Most controllers will use a low voltage trigger or inhibit line like the Harbor Freight lathe. 

My design relies on a latching circuit for basic operation – so here’s how that works…

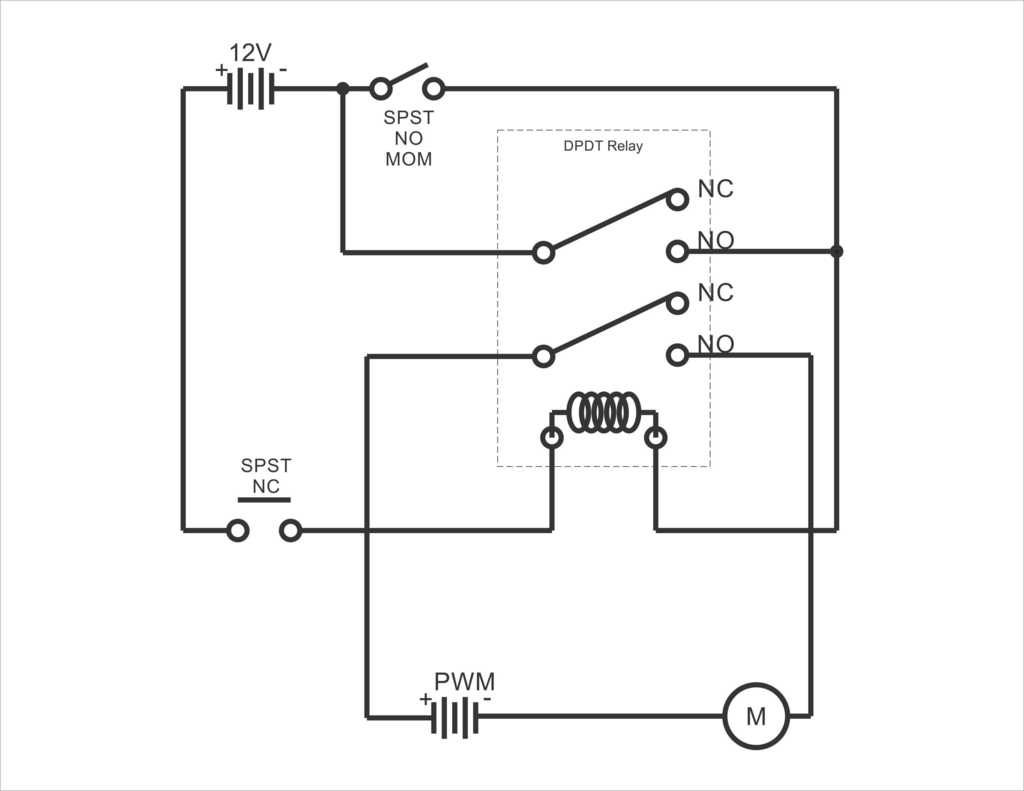
Here’s an animation I did to illustrate the basics of a latching circuit – you’ll find that this is directly relatable to the schematic posted below. 

latching_animation_zpsz61m6bzo.gif?width=640S1 is a momentary action switch, so it returns to it's original position after you press it, but while pressed, this is what the circuit looks like... S1 is pressed and latches the upper portion of the relay, both armatures move as one and the lower armature circuit completes the circuit between the motor and it's power supply, and the motor begins to run.

latching2_zps7ngcjuio.jpg?width=640
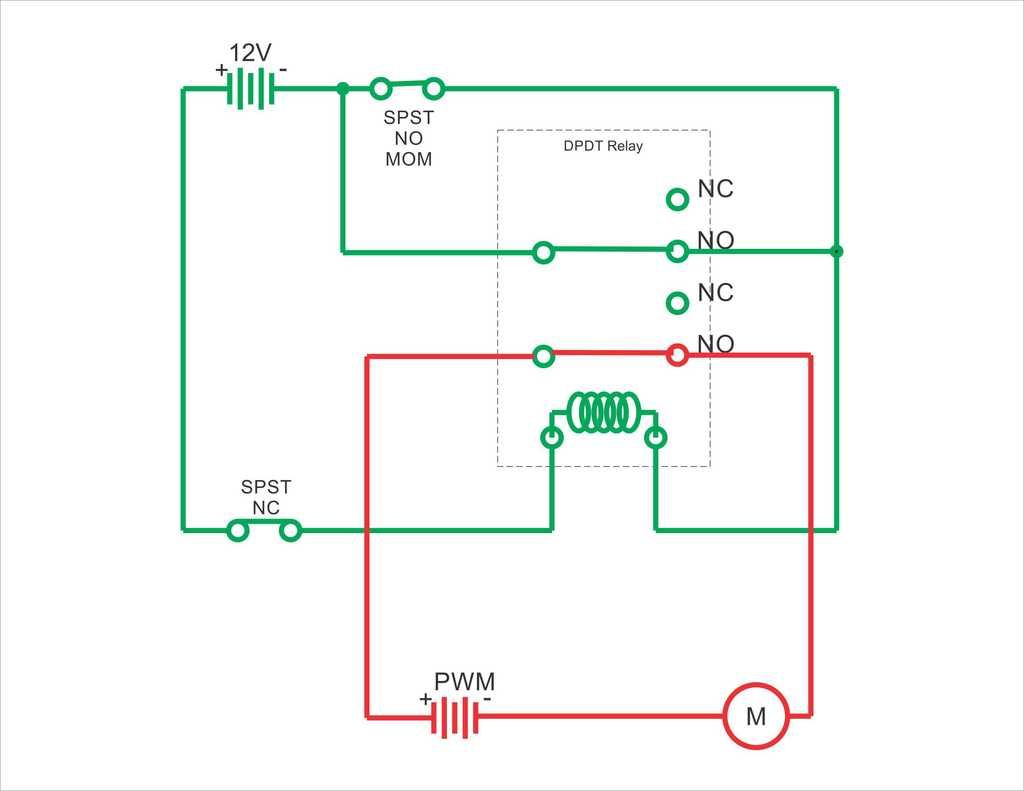
S1 is released, and through the nature of the circuit, the relay remains "Latched". The coil is still conducting and pulling both of the armatures into a closed condition and the motor and it's power supply are still bridged so the motor continues to run. 

latching3_zpsieesipor.jpg?width=640
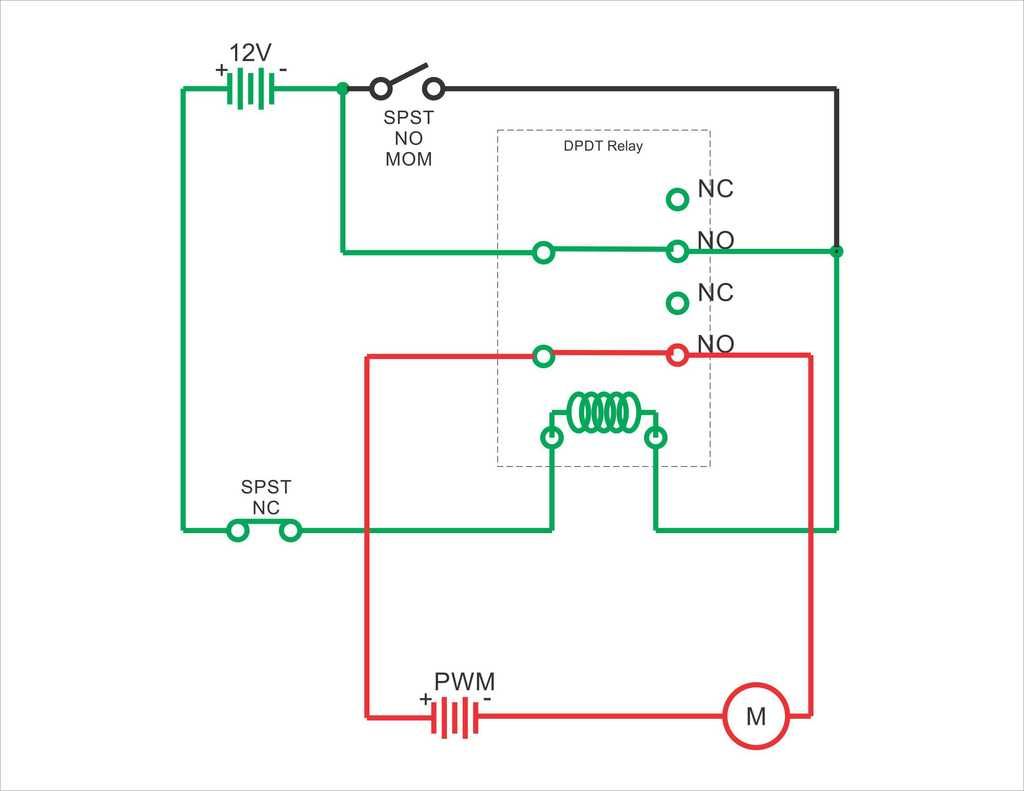
The momentary switch labeled S2 in this schematic represents the "normally closed" outputs of the counter's relay. Imagine that you have the counter set to spin until it reaches 10,000 winds and it gets there. The Normally closed contacts on the counters relay open, thus breaking the electron flow through the coil, thereby releasing the armatures, severing the circuit between the motor and it's power supply and the motor stops spinning. The circuit is now in a rest state and "unlatched". The circuit is reset and made ready to run again when you press the reset key on the counter, thereby closing S2. 

latching4_zpscb9tebsx.jpg?width=640 

Interfacing with the Harbor Freight lathe –

interface_zps7cwgrwx8.jpg?width=640
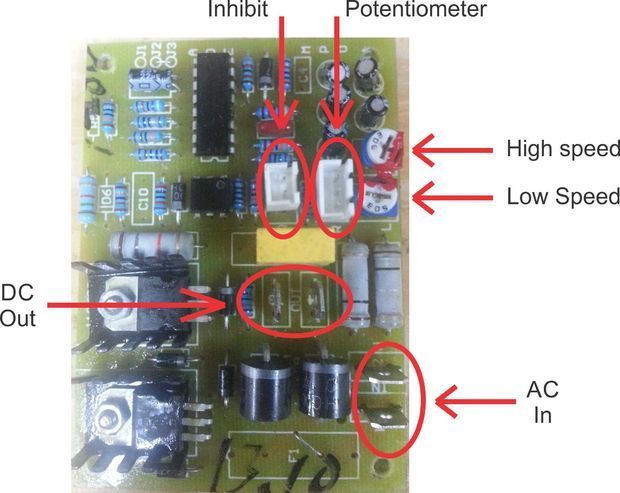
This is the motor control board for the Harbor Freight 8x12 wood lathe and probably several others..... 


Here's how everything works - 

DC out - motor for the lathe
AC in - AC input from wall (mains)
Potentiometer - (controls lathe min-max speed)

Inhibit - what we're using to stop the motor at the specified number of turns. Most commercial DC motor controllers have some variation on this theme... some provide braking and others, like this one, kill the DC voltage going to the motor. Other variations of lathes use this input for a type of safety circuit or to make sure chip guards are in place. 

For some unknown reason of applied goofiness in engineering, on this lathe, this line was attached to a momentary push button switch labeled "circuit breaker reset"... whatever.

*** In this design, it's now connected to the "Normally Open" outputs on the counter module - when those outputs close when the preset count is reached, the motor controller shuts off. ***


As for the High and low speed adjustments, they do exactly what they sound like :-) - adjust the lower one to have the motor start at 0 RPM's instead of a "really not appropriate for this application" 750 RPM.


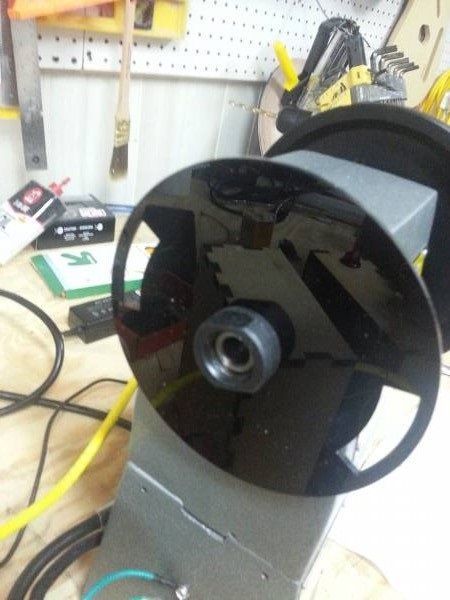
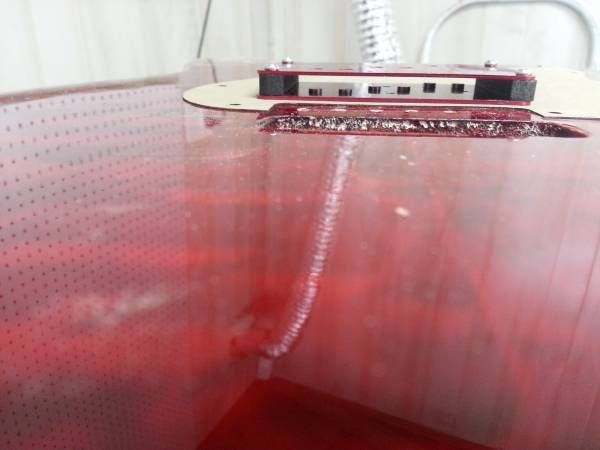
Opto interrupter disk and opto interrupter for counting winds

Here's a view of the left side of the lathe with the plastic bell housing removed showing the opto interrupter disk I cut and the assembly steps –

Spindle assembly ready for optical interrupter instillation (remove the plastic bell housing and the outer most jam nut) - 

opto_ready_zpsfljwasgc.jpg?width=640
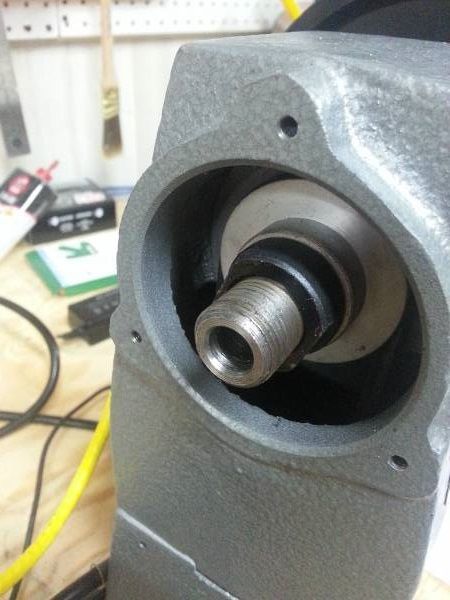
Place spacer on spindle shaft (I laser cut this spacer, but you could stack washers to achieve the same effect) -

shaft_spacer_zpsezqolamm.jpg?width=640
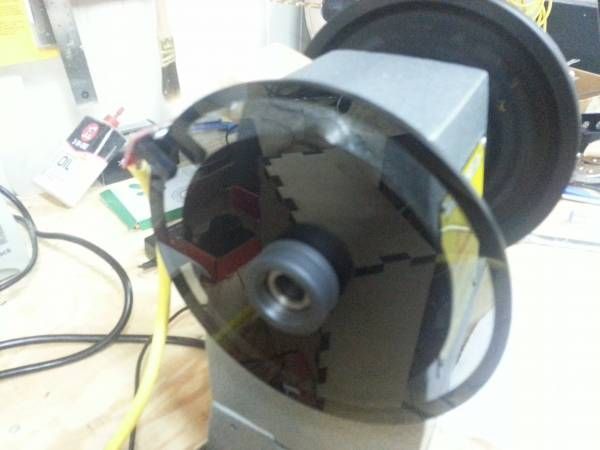
Spindle assembly ready to go with the new opto interrupter disk and outer jam nut installed – you need 2 windows on the disk and it needs to be well balanced, 3000 RPM is unforgiving in this area.

opto_installed_zpsdbui2fon.jpg?width=640Under power at 3200 RPM – smooth as silk.

under_power_zpsjlwxjw2m.jpg?width=640Opto Sensor & Winding Bar

This photo shows the opto sensor on the top of the lathe – it just attaches with a magnet and hangs over the disk. I’ll take better pics of this area as soon as I get a chance.

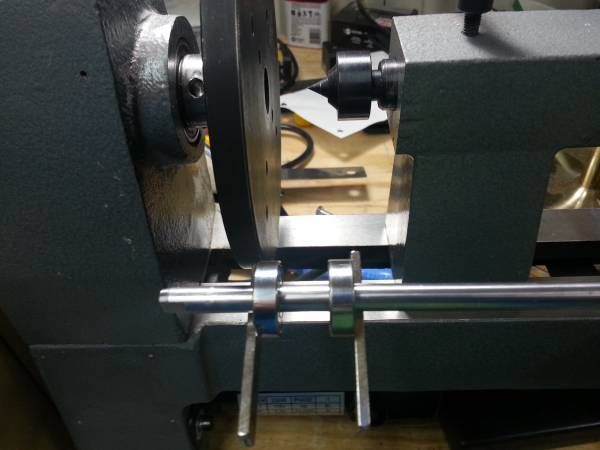
The winding bar is made from 10mm stainless stock (what I had laying around). You just need a piece of round stock that will fit in the opening of the cross slide (included with the lathe).

opto_zpsyjsrw2ba.jpg?width=640

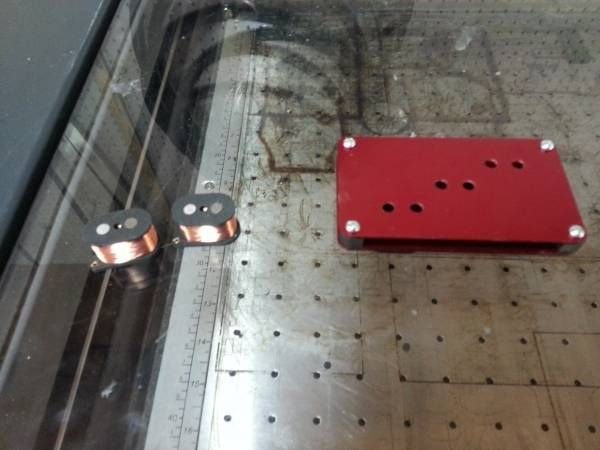
Magnetically adjustable wire guides

This innovation is kinda cool and works very, very well. The wire guides are 10mm ID ball bearings held in place and adjusted by magnets (way easier to adjust position then using set screws). Set screws are a pain, and not needed. It's super handy to be able to adjust the wire guides without fuss mid wind.

Buy ball bearings that fit your round winding bar from the previous step. McMaster Carr is a good source.

winding_bars_zpsmofxxako.jpg?width=640


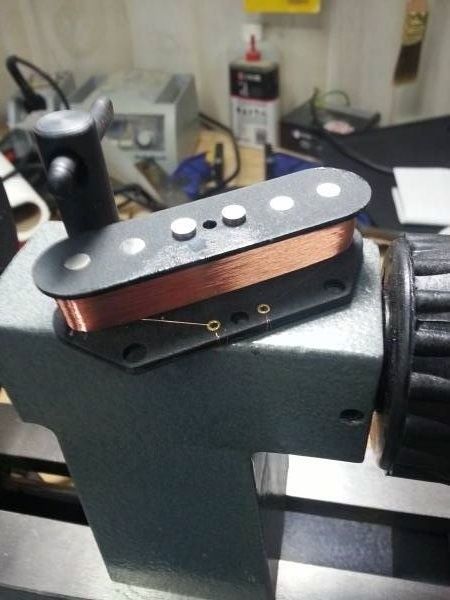
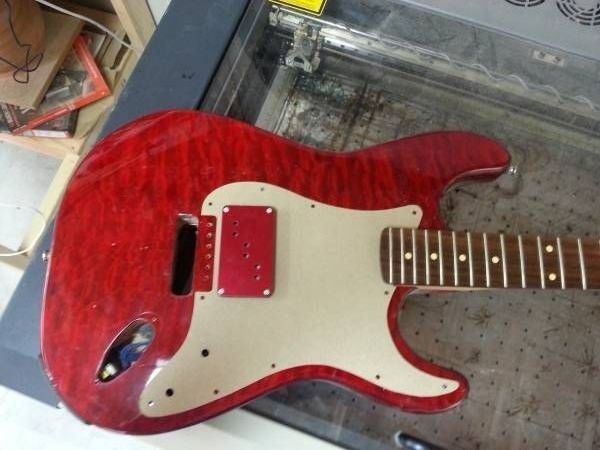
Handwound pickup goodness...

This winder is capable of producing some truly spectacular pickups - if there's interest, I'll do a start to finish on pickup making, from making the flat work from scratch (just like the ones above) to potting the pickup in wax and all points in between.

d5d1b5a0-25d4-4fcb-96c1-1c2ef2236c75_zpsagodm7ns.jpg?width=640

telep2_zpsbzhut9qe.jpg?width=640

telep3_zpsthlrkbgr.jpg?width=640

custom_zpsr77vlrhm.jpg?width=640

custom2_zpsm7e9dyap.jpg

402b114e-9767-4819-89cd-8a79bbfb1ac1_zpsqsrm9rxf.jpg?width=640

Read more…

Need wiring help!!!

I've been making CBGs for a few months now.  So far I have 16 that range from simple 3 string acoustic slide guitars to fully fretted 4 string 2 humbucker electric.  I love the hobby and try to do something different with each one but I've hit a snag.  All my electric guitars, other than ones with piezo pickups, have an annoying buzz when I plug them in.

I've tried humbuckers, coil pickups and clip-on acoustic pickups (mounted as a surface mic).  Some I've soldered and some were pre-wired.  No matter what I use, I get that buzz.

Is there something I'm missing?  Shielding, grounding, feedback I'm overlooking?  I just can't get a clean sound when I plug in.

Please help

Read more…

9353838486?profile=original

I learned a few things making my first scarf joint, I hope what I learned helps you.

I started by using the above diagram as my guide. I can do this I thought. Just decide which method I want, measure, cut and glue (very precisely) and I'm done. Except, as I started to measure and make some calculations, I discovered there were questions the diagram did not answer. After building a few CBGs, I do know how long a board I need  if i'm not using a scarf joint. But the diagrams above did not answer some basic questions - is the board necessarily longer (or shorter?) and by how much? And would Type 1 be longer or shorter than Type 2? Does the headstock have to be longer for Type 2? and if not, again, what measurements do I use? Should I leave it to trial and error? No, wood is a precious thing to waste. So I got me a pen and a paper (and I made up my own little sign... sorry, I couldn't resist) and did some math. 

The answer is - the board is the same length for all three, no scarf joint,Type 1 or Type 2.

First, make your calculations as if you were building without a scarf joint to determine the board length (this takes into account your box size, the length of your headstock, etc.). Then, use the following steps to help you measure and cut so the headstock will be exactly as long as what you want, for either Type 1 or Type 2.

Let's say we want the headstock to be 130 mm (about 5 inches). The following templates represent a 3/4 inch thick neck, about 20 mm. 

9353839064?profile=original

Type 1 - Measure as shown from the tip of the board. Draw the 15 degree angle as shown, Cut and position the headstock as shown. This will give you the 5 in. / 130 mm you want for the head stock. The fingerboard in this method will cover the glue joint.

Notice the joint is visible on the upper surface of the neck - may want to use this type if you are going to add a fingerboard to cover the glue joint. 

9353840271?profile=original

Type 2 is a little different but just as simple. Measure as before from the tip of the board but on the opposite surface. Draw the 15 degree angle as shown. Cut and position the headstock as shown. This will give you a 5 in. / 130 mm head stock.

The upper surface shows no glue joint, so visually it's clean. If the glue joint on the headstock offends you, you can glue a veneer over it. 

For my first test, I actually cut up some rigid styrofoam insulation to confirm these measurements. The results don't look very pretty so I made the above templates to more clearly demonstrate what to do. Hope this helps!

9353840695?profile=original

Also, here's a diagram of my scarf joint jig. It is a rectangular box, made of poplar scraps, bolted (but easily removable) to the mitre guide of the table saw. My sincere thanks to the person who posted the photo of this guide in Google images, I was not able to relocate the original photo to thank the author for providing such a simple solution. The bonus of this jig is I can use the saw's mitre gauge to measure any angle I wish to cut.

Comments and feedback welcome!

And here's a photo of the glue up of my first scarf joint

9353842074?profile=original

Read more…

My First Cigar Box Guitar

My First Cigar Box Guitar

So my introduction to the cigar box guitar was quite by accident. Talking on a forum about the topic of guitar enthusiasm, I ran across a YouTube video regarding CBG's while researching the subject of guitar history. I was intrigued. The history and the simplicity of the instrument was compelling. The more I learned, the more I wanted one of my own. Eventually I ran into an instructional video that showed me how to build one. And so I was off to the stores to buy the things necessary for the project. Below are the steps I took in the process.

It should be noted that I have a work bench in my garage, a table saw, a drill press, and an assortment of 9353842498?profile=originalother tools. Nonetheless, I'm confident that I could have built a cigar box guitar with nothing more than a coping saw, hand drill, a screw driver, sand paper, a file, and a couple drill bits...plus some wood glue.

The BASIC DESIGN of my first was built on a 23” scale.  Many people opt for a 25” scale, but this being my first, I went with the scale offered in the video. The needed materials are a cigar box, a length of hardwood, tuning keys, guitar strings, an eye bolt, and wood screws. There are other possible materials that can be used, which I will discuss later.

Finding a CIGAR BOX was easy. There are two cigar shops near my home. Most cigar shops will save their cigar boxes and sell them to the general public. You'll most likely find them stacked on a shelf somewhere in the shop. Their prices generally vary depending on the quality of the box—anywhere from 99 cents to 5 dollars. So finding a box should be simple.

A length of hardwood for the NECK should be relatively easy to find. Beware, however, hardwood can be expensive. When I went to the store I found a 10 foot length of maple, and I misread the price, thinking it was less than 3 dollars, When I arrived at the counter, I learned that the price was per linear foot, so I found myself paying nearly 20 dollars for an excessive length of neck material. Fortunately I had planned on building several CBG's in the future for family and friend, so I was able to use the extra material. I should note that Lowes has a good selection of precut hardwoods, and that is where I now go for my neck material. Though I chose maple, any hardwood should work fine for the neck. If you're on a tight budget, poplar is economical. What you're looking for is a 1”x2”x4' piece of neck material. Keep in mind that a 1'x2” is actually 3/4”x1-1/2”.

9353843466?profile=originalTUNING KEYS can be expensive. I first called the local guitar shops, and they were asking 4 dollars and up each. Flabbergasted, I turned to Amazon, where I purchased 6 for a little more than 8 dollars total. They actually turned out to be quality tuning machines and worked out great on my CBG.

A package of guitar STRINGS can be had for less than 4 dollars at Amazon or your local guitar shop. I used D'Addario acoustic string. You will only need the A, D, and G strings from the package.

OTHER TOOLS: a 3/8” drill bit and a 3/32” drill bit. The larger bit is for drilling the holes for the tuning keys, and the smaller bit is for drilling the string holes on the tail of the neck. Do double check the diameter of the casing on your tuning keys before drilling the holes. I found that mine were a hair larger than 3/8” and had to ream the holes with the drill bit before the tuning key would fit correctly.

So, in a nut shell, you are building a neck that is fitted within a cigar box. The neck is used to hold the strings and take the tension of those strings. The box is the resonator—it vibrates when you pluck the strings. The idea is incredibly simple and efficient.

First we want to CUT THE NECK TO LENGTH. Since I was working with a 23” scale, a 30” neck was adequate for my needs. This allowed for a 3-1/2” notch at the head and 1-1/2” for the tail. Notching the head for the tuning machines was easy on my table saw, but you can accomplish the same results with a coping saw. It just takes more effort and more time. The tail is where your strings are anchored through three holes.

9353843883?profile=originalNOTCH THE HEAD AND DRILL THE TUNING KEY HOLES AND THE STRING HOLES. You want to notch the head of the neck, only enough so that your tuning machines fit correctly. Check them for the correct dimensions. Most come with sleeves that tighten down after the mechanism has been inserted into the hole. The string hole are drilled on the tail end of the neck, about 1/2” from the very end.

After you notch the head and drilled the holes for the tuning keys on the head, and drilled string holes on the tail, you want to determine the center on the two ends of your cigar box. Most people use painter's tape so that they are not marking the cigar box itself. From those center points, draw the outline for your guitar neck, where it will fit through the ends of your cigar box. Using your coping saw, CUT OUT NOTCHES FOR THE NECK (remember, it is better to undercut than overcut.) Use your sandpaper to finish the openings, which should give you a good fit.

Okay, at this point I should mention my deviation from most other builds. Most builders will notch the neck so that when the lid of the cigar box is closed, the top of the neck (fret board) is even with the top of the cigar box. To alleviate some extra cutting, I simply used a 1/4”x2” piece of poplar that was glued to the top of the neck. I determined the length of the cigar box then cut the poplar so that there were two pieces: one for the tail and one for the fret board. I notched the cigar box deep enough to allow for the main portion of the neck—the poplar was then used to bring the top of the neck even with the top of the box.

You can use either method. The choice is yours. I simply found it easier to glue material to the top of the neck rather than having to remove material from the neck. Much of your options will be determined by the type of cigar box you are using for your build. It does pay to stop and think about how the neck will fit in your box. Creativity is your friend when building a cigar box guitar.

ALLOWING FOR RESONANCE is important. Where the neck passes through the cigar box, you should allow for a 1/16” gap between the top underside of the cigar box and your neck. This will allow the top of the cigar box to vibrate freely. Again, I used my table saw to work away the material, but a person could just as easily use a rasping file. 1/16” isn't that much material to remove.

REINFORCING THE BOX is always a good idea. When I built my first, I cut small blocks of maple and 9353844684?profile=originalglued them in the corners of the box. I also added material between the bottom of the box and the neck, giving it some added bracing.

ATTACHING THE NECK may or may not be necessary. On my first build I found that it wasn't really needed. The neck sat snug within the box and there was no play whatsoever. Nonetheless, I decided to secure it with two wood screw from the backside. I suppose a person could glue the neck in place, but my feeling is that the neck should be removable, should anybody want to make alterations in the future.

THE NUT is a matter of preference. I chose to notch my fret board at the head and insert a thin strip of maple. It stands maybe the width of a quarter higher than the fret board. I've seen many CBG's that use a threaded bolt as a nut. I've read where people have use chop sticks. I think creativity and inspiration is key.

THE BRIDGE is also a matter of preference. On my first build I cut in half a piece of 1/2” round stock. On my second build I went with a 1/4” eye bolt. I believe the eye bolt gives better resonance (louder), and it has become my choice for future builds. Again, I think creativity and inspiration is key. Just remember that the bridge must be place the correct distance from the nut. In my build, that would be 23” plus 1/8” compensation. If you were to build around a 25” scale, then the distance between the nut and bridge would be 25” plus 1/8” compensation.

STRINGING THE GUITAR is straight forward. The strings go from top to bottom, A, D, and G. The string are tuned--again from top to bottom--G, D, G.

So once you have your guitar strung and tuned, you're ready to play. Most people will mark the fret positions with a pencil on the top of the neck. I've been using three dimensional stickers on mine. I chose to mark out both the pentatonic blues scale and the chromatic scale on my first cigar box guitar. There are several websites that offer fret position locators for whatever scale your guitar is using.

9353845054?profile=originalOPTIONS for you cigar box guitar are numerous. One of the joys of building you own CBG is the amount of flexibility it offers for creativity. There are a few additional features I will mention here: If you're concerned about your strings biting into the wood where they anchor at the tail, you might consider using the sleeves from pop rivets. Those that I use are labeled 1/4”x3/16” (aluminum). The downside is that they come in a box of 50. Sound holes are another possible feature, but beware that there are plenty of options surrounding the trimming of such, so it's best to research the many ornaments available before actually cutting a hole. Fretting your guitar is also a possibility; however, having the correct saw is absolutely imperative. Fret tangs are usually .023” wide, and if you don't have a fret saw that cuts exactly .023” wide, you won't succeed.

There it is. I think everybody who owns a guitar should also build one, even if it's just a cigar box guitar. They are incredibly fun to build and offer a degree of satisfaction when complete.

Read more…

CBG's another X#@%&$ try!!

9353875100?profile=originalHi, I just wrote a heap of info about these guitars prior to this and attached photo's. [I thought] but the photo's displayed but the text did not, and not all the photo's either and not in the correct order. So I thought I'd try this blog thingy. Looks like only one photo, what a crappy site this is. I know I'm missing something but this is the worst forum I've had to use. Anyway enjoy I'm done complaining.

Cheers Taff

Read more…

CBGitty Gold Foil pickup

I recently finished a 2 string slider. I took apart a Gitty gold Foil pickup and mounted the coil in the lid. The coil is only a 1/4" thick and fit nicely in the lid, and sandwiched it between 2 pieces of a cut up sesame oil can from work. There was a bit of feedback at first so I took it apart and put a strip of electrical tape on both sides of the coil, that cut out most of the feedback. It is some what microphonic but not to bad. I grounded the pieces of can, very quite no string buzz. The box is 1 1/4'' thick. More pictures and video at http://bscbg.com/for-sale

9353875256?profile=original9353875682?profile=original

Read more…

the prison camp violin

The Prison Camp Violin
clineviolin.jpg
 Guidepost Magazine - January 1997
 by Clair Cline, Tacoma, Washington
 Stalag Luft I Prisoner of War


He carved it of rough-hewn bed slats with a penknife traded for Red Cross rations. But would it play?

 In February 1944 I was a U.S. Air Corps pilot flying a B-24 bomber over Germany when antiaircraft fire hit our tail section and we lost all controls. We bailed out and on landing I found myself in a field in occupied Holland, just across the border from Germany. We were surrounded by villagers asking for chocolate and cigarettes. Then an elderly uniformed German with a pistol in an unsteady hand marched me to an interrogation center. From there I and other prisoners were shipped to Stalag Luft I, a prison camp for captured Allied airmen.

 The camp was a dismal place. We lived in rough wooden barracks, sleeping on bunks with straw-filled burlap sacks on wooden slats. Rations were meager;  if it hadn't been for the Red Cross care packages, we would have starved.  But the worst affliction was our uncertainty. Not knowing when the war would  end or what would happen (we had heard rumors of prisoners being killed)  left us with a constant gnawing worry. And since the Geneva Convention ruled  that officers were not allowed to be used for labor, we had little to keep  us occupied. What resulted was a wearying combination of apprehension and boredom.  Men coped in various ways: Some played bridge all day, others dug escape tunnels (to no avail), some read tattered paperbacks. I wrote letters to my wife and carved models of B-24s.

 The long dreary months dragged on. One day early in the fall of 1944, I  found myself unable to stand airplane carving any longer. I tossed aside a half-finished model, looked out a barracks window at a leaden sky and prayed in desperation, "Oh, Lord, please help me find something constructive to do."

 There seemed to be no answer as I slumped amid the dull slap of playing cards and the mutter of conversation. Then someone started whistling "Red Wing" and my heart lifted. Once again I was seven years old in rural  Minnesota listening to a fiddler sweep out the old melody. As a child I  loved the violin and when a grizzled uncle handed his to me I couldn't believe it. "It's yours, Red," he said, smiling. "I never could play the thing, but maybe you can make music with it."  There were no music teachers around our parts, but some of the old-timers who played at local dances in homes and barns patiently gave me tips. Soon I accompanied them while heavy-booted farmers and their long-gowned wives whirled and stomped to schottisches and polkas.

 I thought how wonderful it would be to hold a violin again. But finding one in this place would be impossible. Just then I glanced at my cast-aside model, and a thought came to me: I can make one! Why not? I had done a little woodworking before I was in the service. But with what? And how? Where could I find the wood? The tools? I shook my head. I was about to forget the whole preposterous idea when something caught me. You can do it. The words hung there, almost as if Someone had challenged me. I grew up on a farm during the Depression, and had learned about resourcefulness. I remembered my father doggedly repairing hopelessly broken farm equipment. "You can make something out of nothing, Son," he said, looking up from the frayed harness he was riveting. "All you've got to do is find a way . . . and there always is one."

 I looked around our barracks. The bunks. They had slats! Each was about four inches wide, three-quarters of an inch thick and 30 inches long. A few wouldn't be missed. Just maybe, I thought, just maybe I could. I already had a penknife gained by trading care-package tobacco rations with camp guards who delighted in amerikanische Zigaretten. Glue? It was essential. But glue was practically nonexistent in a war-ravaged country. "There's always a way," echoed Dad's words.

 One day I happened to feel small, hard droplets around the rungs of my chair. Dried carpenter's glue! I carefully scraped off the brown residue from a few chairs, ground it to powder, mixed it with water and heated it on a stove. It would work. I cut the beech bed slats to the length of a violin body and glued them together. Then I began shaping the back panel. A sharp piece of broken glass came in handy for carving. Other men watched with interest, and some helped scrape glue from chairs for me.

 Weeks went by in a flash. I shaped the curved sides of the body by bending water-soaked thin wood and heating it over the stove. My humdrum existence became exciting. I woke up every morning and could hardly wait to get back to work. When I needed tools, I improvised, even grinding an old kitchen knife on a rock to form a chisel. Slowly the instrument took shape. I glued several bed slats together to form the instrument's neck.

 In three months the body was finished, including the delicate f-shaped holes on the violin's front. After carefully sanding the wood, I varnished the instrument (that cost me more cigarettes) and polished it with pumice and paraffin oil until it shone with a golden glow.

 A guard came up with some catgut for the strings, and one day I was astonished to be handed a real violin bow. American cigarettes were valuable currency, and I was glad I hadn't smoked mine.

 Finally there came the day I lifted the finished instrument to my chin. Would it really play? Or would it be a croaking catastrophe? I drew the bow across the strings and my heart leaped as a pure resonant sound echoed through the air.

 My fellow prisoners banished me to the latrine until I had regained my old skills. But from then on they clapped, sang, and even danced as I played "Red Wing," "Home on the Range" and "Red River Valley."

 My most memorable moment was Christmas Eve. As my buddies brooded about home and families, I began playing "Silent Night." As the notes drifted through the barracks a voice chimed in, then others. Amid the harmony I heard a different language.  "Stille Nacht, Heilige Nacht, alles schläft, Einsam wacht . . . " An elderly white-haired guard stood in the shadows, his eyes wet with tears.

 The following May we were liberated by U.S. troops. Through the years, the violin hung proudly in a display cabinet at home. As my four children and six grandchildren grew, it became an object lesson for escaping the narcosis of boredom.

 "Find something you love to do," I urged, "and you'll find your work a gift from God." I'm happy to say all of them did. In the fall of 1995 I was invited to contribute the violin to the World War II museum aboard the aircraft carrier Intrepid in New York. I sent it hoping it would become an object lesson for others. But I was not prepared for the surprise that followed. I was told the concertmaster of the New York Philharmonic would play it at the museum's opening. Afterward he called me.  "I expected a jalopy of a violin," said maestro Dicterow, "and instead it was something looking very good and sounding quite wonderful. It was an amazing achievement."

 Not really, I thought. More like a gift from God.   


Since CLAIR CLINE returned from World War II, The Prison Camp Violin he made has been heard in concert halls across the United States. Most  recently it was played by Glenn Dicterow of the New York Philharmonic during  a ceremony at the Intrepid Sea-Air-Space Museum in New York City. "Violins have to be used if they are going to remain effective," says Clair. "I  believe I need to stay active too." Now that he has retired from cabinetmaking and construction work, Clair and his wife, Anne, stay busy growing fruit, flowers and vegetables in their garden.  The couple recently celebrated their 57th wedding anniversary, and their four children and six grandchildren are the joy of their lives. Music has remained important, and oldest son Roger, granddaughter Jennifer, and grandson Daniel, play in the Chicago, National, and Arkansas symphony orchestras, respectively.

As their children grew up, the violin rested in a display case in the Clines’ home. Each child was told the violin’s story as a lesson in resourcefulness. But its value goes far beyond that.

more here: http://www.merkki.com/stories.htm

and to think no one was hawking cheapo parts through any ' magazine' to this guy. love his ingenuity

Read more…

How to use grain filler for a smooth finish

9353870298?profile=original

I have always used oak for my necks, and at first I was always frustrated that no matter how well I sanded the wood, the oak's open pores meant that the finish was never completely smooth. After a bit of research I came across grain filler, and ordered a tin of Rustins.

grainfiller%20for%20web.jpg

Grain filler is different from wood filler, which is used to fill larger voids in wood. It comes as a thick putty which you thin down with white spirit (mineral spirits) or turpentine to the consistency of cream. You then apply it to the grain of the wood and it does a pretty good job of filling in the pores. I use the 'natural' version for oak, but they do other shades for darker woods etc.

9353871453?profile=originalFirst off, get your neck sanded down as smooth as possible. I do mine up to 320 grit at this point. Then give the neck a wipe down with white spirit to remove the wood dust.

9353871896?profile=originalI apply the grain filler all over the neck with my finger, rubbing it lengthways into all of the pores. Once the whole neck looks done I leave it to dry overnight.

9353872287?profile=originalThis is what you see after the grain filler dries out. At this point I just lightly rub the excess off the surface with my thumb until I see this:

9353872697?profile=originalThe pores are now filled in. Now it's time to lightly sand again, starting at 220 grit and working up to 600. A quick rub down with white spirit again and you're ready to start applying finish.

9353873484?profile=originalAs you can see, the grain filler does a really good job of blending in with the wood tones. 

9353873080?profile=original

The same neck after an additional 6 coats of Tru-Oil, then a final 1200 grit wet sanded coat a week later. Lovely and smooth! I hope this helps.

-Richey Kay

9353874074?profile=original

Read more…

9353867867?profile=original

More tips and a bolt on neck visual.

  1. Much has been said about thinning tops and bracing them. I would go a step further and say try to have the top and bottom sound boards vibrating differently (i.e either braced/not braced, or differently braced- use ladder on the bottom sound board as it takes less strain from the strings, or different woods/thicknesses)  the sides make very little difference but need to be as stiff as possible! i.e. make them thick and solid!!

  2. The first thing I learnt from the old forum (pre nation days) was the sound hole size needs to be no bigger than a quarter. On a smaller box you can lose treble sounds with a sound hole too big.

  3. If you are going acoustic get the bridge in the middle of the sound board as much as possible, I forever see bridge near the tail of the guitar which will dampen the vibration and therefore the sound.  Of course this can reduce the break angle that’s available, and it’s not important if you are planning on using it plugged in.

  4. The following is a photo of a bolt on neck design. Ignore the bent thread :) but it gives another way of attaching a neck to a box.  It has the advantage of being able to swap the box or neck out, and by changing the cut angle the neck can have a slight relief which makes it more playable – especially with fretted necks, you can get a really low action this way.  Gives a lot of room inside the box for pickups too, as well as removing the weak point that normally happens with a stick through box design as the neck enters the box/ or the neck gets altered to make room for pick ups etc. Note the box has been re-inforced to handle the strain. And as you can see it can be forgiving for shoddy workmanship…9353869080?profile=original

9353868472?profile=original

Read more…

9353867452?profile=original

Cigar Box Guitar and classical music meet again after 150 years!  

Legend has it, in the middle of 19th century, there were musicians who performed classical pieces on homemade instruments such as Cigar Box Guitar.  Unfortunately, there are no records of these unique 
performances.

So what does classical music of the Renaissance sound like on cigar box guitar? 

Hailing from Moscow, Russia, Evgeny Nemov, aka "Captain Nemoff" released an album that answers that question...and it's one of the best albums I've ever listened to.  Das Wohltemperirte Cigar Box Guitar(translated: The Well Tempered Cigar Box Guitar) is a download album available on CDBaby that mixes brilliant classical playing with the lo-fi ethos of the Cigar Box Guitar Revolution.

Nemoff starts off the album quietly, with a soft acoustic rendition of Albinoni's Adiago in G minor that eventually morphs into primal territory with an electric slide CBG (!) solo.  Oh how I love to hear the unfiltered sounds of trashy cigar boxes playing classical!  He covers a lot of the standards including Fur Elise and Greensleeves, mixing several homemade instruments together in beautifully layered pieces. 

My brain nearly exploded Nemoff kicked in some massive foot stomping bass drum in the Celtic wedding song,Ev Chistr 'TaLaou!  This is rock and roll from another era. 

Nemoff deeply considers and arranges with a mindset that only a cigar box guitarist could possess. 

Perfectly ending the album, Nemoff delivers Shubert's Ave Maria in acoustic majesty, at first picking out single note leads and then mandolin-style tremolo picking.  It put tears in my eyes. 

Masterpiese of Album:   https://youtu.be/ed_ZREPNmbc

Wait...I'll take it a step further.  In my honest opinion, this is one of the greatest cigar box guitar albums in the history of the modern movement.  Not only is Nemoff an incredible guitarist with one foot in the classical tradition, but he's also got one foot firmly in the cigar box guitar ethos... mixing lo-fi acoustic and electric tones brilliantly in each piece.   

My heart is overjoyed as I listen to this album.

Buy the download of this album.  Buy it today. Blast it in your woodshops.  Play it in the house.  This is one for the ages.  5 stars.

Das Wohltemperirte Cigar Box Guitar

by Captain Nemoff - $9.99 download at CDBaby

Read more…

How to level, crown and polish frets

This is something I waited way too long to try. I never really had a big problem with frets buzzing, but having all of your frets perfectly level and polished is a wonderful thing.

There are numerous ways to approach this task, and please bear in mind that this way works perfectly with an instrument with a flat fretboard, whereas the technique would be a little different with a radiused neck.

9353861082?profile=original

I ordered myself a fret crowning file from eBay. This one was around £25, and came complete with several grades of sandpaper from 800 to 2500 grit, a spring steel fretboard protector (to use while sanding) and a gummy rubber to clean the file. The file itself is concave and fits neatly over an individual fret, it is a diamond file and will give a good and smooth result quickly. They are custom made by a guy in the UK. Link here

To begin with, clamp the guitar down to you bench/table. I used some soft materials to prevent any scratches to the finish. I also masked off the pickups, so I didn't get any metallic dust in there.

9353861301?profile=original

Use a felt tip pen to draw a line straight across the tops of all of the frets. I used one of my daughter's Crayolas as they are easy to wipe off in case I slipped. This will be your reference point, as it will highlight any lower frets as you level them.

9353862867?profile=original

Levelling - this is the step that would differ if your fretboard had a radius (of course you can buy fret levelling files for this purpose, and I have heard of sticking sandpaper in your radius sanding block and using that). I ran the finer surface of my sharpening stone back and forth across the fretboard a few times, being careful to apply equal pressure. I carried on until all of the pen marks had gone.

9353863665?profile=original

Notice the flat tops on the frets. The two on the left side of the photo have had the pen line redrawn on them. Now it is time to recrown them.

9353864283?profile=original

With the crowning file, a few passes across the top of the fret will bring back the original rounded top. You want to keep going until your pen mark is just a very thin line across the middle of the fret. One you're happy with it, time to polish them up.

9353864901?profile=original

There are two ways to go about polishing the frets after crowning: Do them individually, using the spring steel fretboard protector and progressing through the grits (800, 1000, 1200, 1500, 2000, 2500) on each fret. This took ages! The second time I did this job I simply masked off the entire fretboard (leaving the frets exposed of course) and sanded the whole lot at the same time lengthways. This was much quicker, and I was happier with the result.

9353865883?profile=original

Once you're happy with the level of polish on the frets, all that's left to do is to gently brush away any metal filings and dust from the fretboard, and get the strings on. 

And there we have it. Despite having no real issues before, the overall feel of the guitar is greatly improved. Of course, if you are experiencing buzz from uneven frets, this fairly simple process will make a huge difference.

-RK

Read more…

Well, last weekend that time of year had come round again, and it was time for me and Hollowbelly to head off to Europe to meet up with our good friends over in Germany for the 3rd edition of the Van Thom Weekender. We were sad to hear that Paul Smith wouldn't be making it due to chronic back problems, hope you can make it another time buddy.  It's a weekend of music, fun and friendship hosted by our good friend and handmade music fan Tourette Van Thom, who, together with his wife Danni graciously hosted us for the weekend and organised the whole shebang.9353848082?profile=originalIt's a while since I've posted on here...mainly because I've been so busy over the summer making guitars, running workshops and trading and performing at festivals here in the UK (last UK festival I did, The Monkees were top of the bill!!), so thought I'd do a quick post before we head back over to the continent (again) next weekend. Huge thanks to Leadfoot who kindly organised our ferry crossings, which helps enormously in making these trips to Europe logistically and economically viable.  So a mere 3 hour drive from the West Midlands to The Hollowhaus on Wednesday night, then off at 5.30am for the 12.00 noon Ferry from Dover. This was the first overseas outing for my new vehicle, a box-stock Mercedes Benz Vito, and it never missed a beat. Plenty of room for gear, comfortable, quiet, easy to drive and not too bad on fuel..all in all, just the ticket....

9353848660?profile=originalWaiting to board the Ferry at Dover Thursday lunchtime.

It was a long, long drag across France, Belgium , Holland and Germany...the ferry was 1/2 hour late setting off, there were roadworks and an accident on the Belgian motorway after two articulated trucks had collided, blocked both lanes, and all the traffic had to sneak by on the hard shoulder with 2 wheels on the grass verge, then the notorious Antwerp ringroad added to the delay. With nothing to loose, we went off piste and hacked our way around the stationary traffic, crossed the river using a tunnel smaller  than the main Kennedy Tunnel that the ringroad takes, but ended up in a Godawful gridlock that was a match that anything central Cairo can come up with (there were no camels or ox-carts, but the traffic WAS worse than when I was in Egypt)...anyway, we slowly managed to ease our way out of town, darting between cyclists and trams as well as other motorised rushhour trafic via a colourful street that was lined with kebab shops and Chinese massage parlours (with the odd sex shop and a Christian mission thrown in for good measure)...yes, it truly was  the home of "the kebab with a happy ending". As the light faded we found ourselves on the Dutch/German border, with the prospect of 4 hours drive ahead to our destination. We stopped for coffee, messaged our host to double check his address and pressed on. At times we were driving along steadily at 130kph in the dark and then suddenly the van would be rocked violently as a big Merc saloon or Porsche wooshed by at well over 200kph. We arrived at nearly midnight, in a tidy, quiet little hamlet outside Bremen which was to be our base for the  weekend. We were greeted by Andy (aka Tourette van Thom), glugged a quick beer and off to bed.

Friday saw us with the only free time that we would have over the weekend. I drove us into town so TvT could check how ticket sales had been going at his outlets. We dropped in at Mike Scott's place where several of the musicians were staying, smet up with our old friend Dylan Walshe from Ireland, and met a new buddy, Jason Thompson from USA.

9353848493?profile=originalJamming with Mike Scott at his apartment...a welcoming crash pad for visiting musos.

9353849078?profile=originalDoing the tourist thing..admiring the porcelain glockenspiel in the city centre..a masterpiece of 1930's expressionist / gemuetlichkeit architecture, with Hollowbelly and Jason Thompson...hillbilly's got culture too y'all...

After a pleasant stroll around the city centre, taking in the medieval main square with its cathedral and town hall, the banks of the river Weser (yes, that one in the "Pied Piper" fairy tale),  and the ancient "Schnorr" quarter with it's maze of tiny alleys and quaint shops, it was off to the venue for to load-in and soundcheck for that night's performance.

Me and HB knew the venue from previous visits, so we were soon set up and ready to go...but my word, was it hot and humid! Mike and his band kicked off, then it was my turn...

9353849658?profile=original

Hot and sweaty in the Roemer. Dylan Walshe up next...then...

9353849679?profile=original

Hollowbelly headlining Friday night....and he got a great reception too!

The music finished at the civilised hour of midnight, so it was break down all the gear, pack it into the van and drive about 1/2 hour out to the sticks..no after gig party for us, straight to bed with the prospect of a long hard day ahead.

Saturday and we were back in town at around 10.30am in the "Viertel", the cosy bohemian quarter where the club is located, and with the help of the people who had booked in for the workshop we got all the gear inside and set up, ready to roll at around 11.30am.

9353850066?profile=original

Tools all neatly laid out and ready to go....

9353850269?profile=original

A quick demonstration before making some sawdust.

We took a break, dining at an excellent local vegetarian restaurant, back to the Roemer to get the guitars decorated, wired up, strung and tuned..and we were ready to do the final part of learning to play. This is where I handed over to Hollowbelly, as by this stage I'm pretty much wrung out.

9353850475?profile=original

Hollowbelly leading the group on the learn to play section.

As usual, he does an excellent job of rounding off the day, pushing my products like a good 'un... we have a dozen happy new converts and I shift a fair bit of merch. too...all in all a good day's work. That's that worst of it over for us...all we need to do is clear the stage for the 5.00pm sound check and get all the tools, workbenches etc out and packed into the van. Phew...we've earned ourselves a beer or two...non alcoholic Becks Blue for me, as I'm driving..it goes with the territory and I'm used to it, it's no pain, and after all, you wouldn'y expect to be allowed to sit a your desk or whatever at work and crack open  a cold one just because you felt like a beer...yes that's rock 'n' roll..but at the same time it's also serious work.

9353851088?profile=originalTaking a well earned break with Rainer, boss at the Roemer before the Saturday evening gig.

So, apart from selling some merchandising and getting us back home at the end of the evening, that's our job pretty much finished for the day, so we can enjoy the music, and talk to friends old and new for the rest of the night. Another great lineup, with the hugely upbeat and happy sound of the Stringtone Slingers opening with a great authentic rockabilly set, the amazingly youthful Danish duo Long Line Down, authentic electric Hill Country from Jason Thompson, rounded off by UK's Rattleshack rocking hillbilly combo. I must admit I had to keep going outside to take the air, as it was so hot in the club, and we'd been in there working all day already..but that was an entertainment in itself. Customers from the Heartbreak Hotel next door brought out some chairs and had an impromptu birthday party on the pavement...

9353851497?profile=original

Outside the Roemer Saturday night..as you can see, no bright lights or shiny signs..Bremen's Viertel is pretty rootsy...

9353851692?profile=originalMadonna's "Like a Virgin" and Spice Girls "Wannabe" sung to CBG accompaniment...outside the Roemer, on guitars made earlier that day.

The evening ended pretty well, with another good turnout, and I sold a 4 string guitar...although the load-out was a pretty grim affair, as the rain started to bucket down around 11.30pm. I stood under the tailgate of the Merc. under the watchful eyes of the local "street vendors" sheltering from the downpour in a nearby doorway while Hollowbelly shuttled out the remaining boxes of merch ( good job we'd loaded up all the workshop gear  earlier in the evening). It was a pretty dreadful drive back out of town due to the weather, but I took it steady and we were back safe and sound before too long. 

Another early start on Sunday morning, and after a hearty breakfast and fond farewells we were on our way. This time we had decent weather and light traffic, so with one stop in the Netherlands to get a bite to eat and fill up with diesel, we were at Dismaland France (the Calais ferry terminal) in time for the 4.00pm ferry. We had the minor problem of being booked on the following day's crossing, but because my youngest daughter had arrived back from 14 months in Japan the day after I left, and was going  away to Sheffield university on Tuesday, and also that my dad is very ill, I wanted to get home so I could see her  and make a visit to my parents in Yorkshire...hence the urgency of getting back earlier than planned. On arrival at the terminal, we were sent to to DFDS office to negotiate an earlier crossing, although we did take a pretty weird route round the docks via the HGV passport check and holding yard, we  ended up on the apron in front of the ferry ..with all the other cars neatly lined up behind us.  We sprinted over to the office, to hear a very harsh and abrupt sounding French ferry ticket seller barking out "Next crossing is 6 o'clock, 120 Euros!!" at someone who'd turned up on spec to get a crossing...and our hearts sank. As it happened, HB explained our predicament, we were told to come back in 35 minutes time to see if he could fit us on the 4 o'clock. When we returned, there was a ruck of people round the counter all trying to either get an earlier crossing or buy tickets...with the minutes sliding away, our turn came and the chap remembered us, then went off to see what could be done. After ages he came back, asked for our passports, and we knew we'd cracked it..another brief wait, he came back, printed our vehicle pass, many thanks and handshakes all round and we were away. Another sprint across the tarmac to show our pass to the guy in charge of the queue our pass and he just gestured and shouted at us to "Allez allez!"...so we ran to the van and off we jolly well allez-ed.  We'd done it, no long wait, no extra charges...straight onto the ferry, so we dashed up the stairs, grabbed some comfy seats, had a bit of scran and shortly we were away back to Blighty. We'd arranged for Hollowbelly to be picked up by his wife at Bristol Gordano services, as it was a convenient midway spot for both of us, so it was a pretty decent drive over there, and we were met around 9.00pm by his wife Maggie and both his daughters. We had a cup of coffee, then  offloaded his gear into the BellyBus, and we went our separate ways, home by not much after 11.00pm for all of us.

So there you go...that's how you do a weekender gig in Europe...1500miles of driving and 34 hours total travel time out and back. We're doing it all again weekend after next...seriously...Belgium on Saturday then back on Sunday for a beer festival gig in East Sussex!

Read more…

Nation head banner

Cigar Box Nation newsletter.  Check out these highlights from all the features posted on our active Facebook page: http://facebook.com/cigarboxnation. ;

Want even more cigar box guitar gear news?  Check out this week's C. B. Gitty newsletter.

9353846475?profile=original1950s tin bread box guitar by Eero Tapani Lehtinen.

Beer can bear staring from the soundhole. 2 magnetic & 1 piezo pickups. Slot for coins.  Visit Eero's Cigar Box Nation profile to see more.

f8oETxR.jpg

NEW SAMANTHA FISH VIDEO - JUST POSTED TO CIGAR BOX NATION FACEBOOK!!!

9353845299?profile=originalRONNIE WOOD ROCKS A CIGAR BOX GUITAR  Legendary guitarist, Ronnie Wood has been filmed using a Daddy Mojo 4-string acoustic cigar box guitar on his latest video, "How Can It Be." 

9353847075?profile=originalJUNK PERCUSSION:  Creativesoundlabs explored a few unique recording methods for recording junkyard percussion. Each of these techniques are from real recording sessions and they each have a story to go along with the sounds.

daff8036-412f-48e5-aecc-78495b1e6125.jpgPIEZO SECRETS CONTEST!!!  Send us your favorite Piezo Tips & Tricks!   What things make your pickups sound great?  Got a favorite setup?  Special methods that nobody has considered?    

9353847090?profile=originalVIDEO LESSON:  HOW TO PLAY THE BEATLES' "DRIVE MY CAR" ON 3-STRING GUITAR Presidents of the United States of America frontman, Chris Ballew releases a new album of Beatles covers for young children.  At the bottom of the link, he gives a video lesson for 3-string guitar (perfect for cigar box guitarists).  Note:  the video is hosted by Facebook.  You may have to be signed into FB in order to view the video. 

9353846875?profile=original

9353847292?profile=original9353847472?profile=original

03630d01-e602-412e-ae60-759269a31e53.jpg?width=581Introducing the Hot Rod acoustic pickup system with Active Jack technology.

  • Loud, distinctive acoustic tones with reduced feedback. 
  • No soldering. No routing for big pre-amps.
  • Easy-to-install.

Our new video shows how you can easily install a Hot Rod Pickup into your cigar box guitar with minimal effort. The Hot Rod maintains a simple setup without any volume or tone controls, created to capture and boost the true acoustic signal.  (Video is in product description.  Scroll down in link.)

b7531c5a-4902-4401-bb32-97cfa6a9765f.jpg?width=397

9353847866?profile=original

Read more…

Barn to Be wild

9353846079?profile=originalOn holiday with friends in Norway recently one day i knocked up this CBG, its rough as hell but was built with what was in the barn.Box is pine made from pine barn planking planed down, Neck 2x1 pine, tuners studding & nuts, bridge 2" of rebar. We had no polish but as the barns in Norway are invariably painted red & there was a drum of that handy thats what i used!

Much to everyones surprise it actually sounded pretty good & was quite loud, Of course it could only be named "Barn to be wild"

Read more…

My First Experience with Cigars

We got holidays in our school. So, we decided to enjoy our vacation as much as possible. So, three of our friends packed the luggage and started our journey to Hill Area.

As soon as we reached the hill station, I saw many people smoking. So, I too got the desire to smoke. I went to the cigar shop and asked for a cigar. He asked which type of cigar do you want?

As Ii was very new to smoking, I said to the cigar shop owner that I am very new to smoking. Then the cigar owner gave me acid cigars to smoke.

As I don’t know how to smoke, it was very difficult and uncomfortable.

Read more…

Here's a portion of Hutch's gear, featuring the Percolator 2W tube amp. Following are his comments. Look elsewhere in this blog for a nice audio recording Chuck made with this setup.

“The amp itself is still in its primal unclothed state, however it has been paired up with a variety of speaker/cab combinations including a 4×4, a 2×4, a big cab 1×12 (20x20x16), and several 1×8 variations. Pictured are the 2 cabs I’ve decided to use. The black one started off as a fender frontman. The guts were ripped out of it and the opening for the controls is blocked off. The back is half open and the 2 ports are open. It has the [ZDL] Jensen speaker in it. Great tone and fills my little studio with sound. More important, to me anyway, is the bass tones are a little more spread out. They’re still there but not as concentrated in one spot. The mids and highs still shine. The amp is going in a cab that will match.
The suitcase has a Celestion 8 fifteen speaker in it. Another good match for the Percolator, I think. It’s a bit brighter than the Jensen. The suitcase setup has a bluesier, looser sound to it. Probably because it vibrates and rattles a bit, but I like it.”

9353845694?profile=original

Read more…