#1 resource for Cigar Box Guitars, Free Plans, How-To, Parts & More!
Hi all - first post and pics of my pickup winder
Hi all, this is my first post here - I make pickups and build guitars but I'm new to making CBG's. I have my materials together and hope to start next week sometime on my first one :-)
In the mean time, some here might be interested in the winding setup I built -
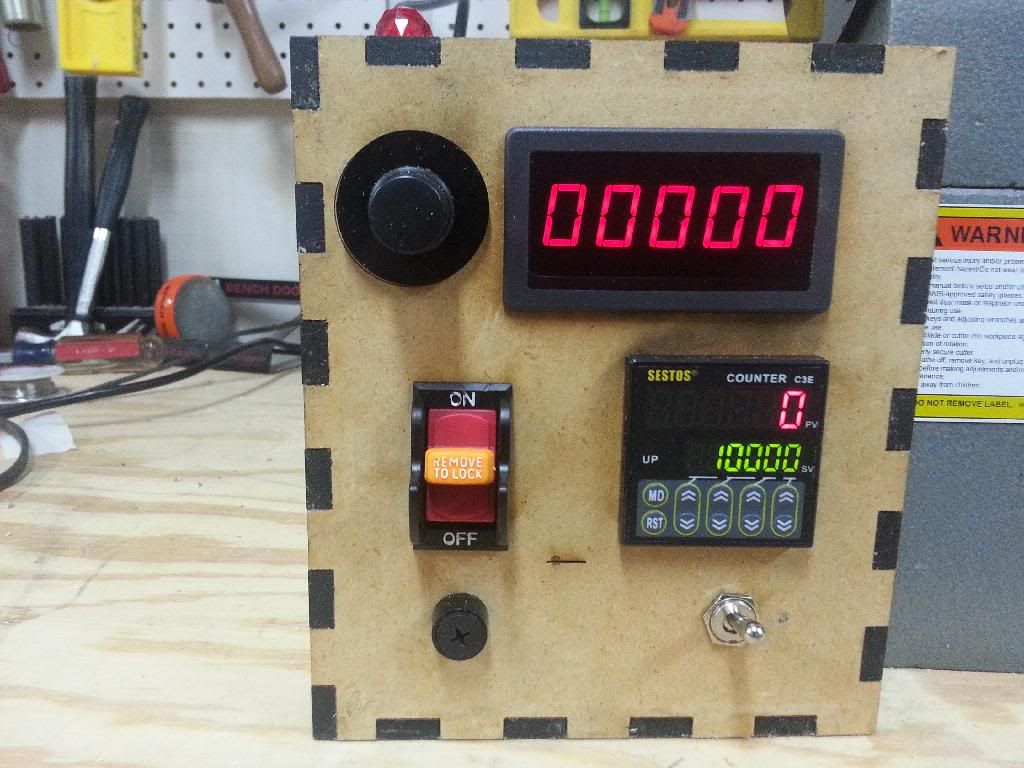
Lathe based, has counter, tach and programmable auto stop. I routinely wind at over 3000 RPM.
Total cost to build was $159.00 and I have a lot of functionality for that price.
If anyone is interested I can post up a build thread.

A few pups that I've wound on it -


String through tri-bucker

Replies to This Discussion
-
Permalink Reply by mojoatomic on
-
Forgot to post this pic of the wire guides...
They're ball bearing races held in place by neo magnets on the winding rod because it's so much easier to reposition them mid wind this way instead of using set screws -


-
Permalink Reply by the anonymous pick on
-
nice!! and welcome ;-)
-
-
Thank you :-)
-
-
Thanks for the welcome!
-
Permalink Reply by Richey Kay on
-
Amazing work, and welcome to the Nation. I make pickups too... but my setup is much more humble!
I, and I'm sure many others would love to see how you made this.
-
-
Thanks for the welcome! Happy to share the design, let me get a post together.
-
-
I'm releasing this under the Creative Commons License - Attribution Non-Commercial Share Alike (CC BY-NC-SA)
Basic idea and prices
I've wanted a new winder for awhile, and thought I could make better than I could buy, and do it for cheaper. I reused everything I could from the basic lathe and used off the shelf components to keep this simple and inexpensive. You just program the number of turns, press go and let it rip while you guide the wire. I don’t see the need for an auto traverse, so I didn’t make one; I like scatter wound PUP’s.
The lathe ships with a starting speed of 750 RPM's, so I modified that. It now starts at 0 RPM and goes to 3400; I also added a forward and reverse switch for CW and CCW operation so you don’t have to flip the pickup over to do a reverse wind – you can even wind stacked humbuckers without removing the pickup to switch direction between the upper and lower coils.
Here's the break down...
Lathe $120 - 20% coupon, think it was $104 after tax
Tach - $9.98
Programmable counter $33.00
DPDT center off switch - $5 (added forward and reverse)
Neon Lamp - $2
Opto interrupter - $5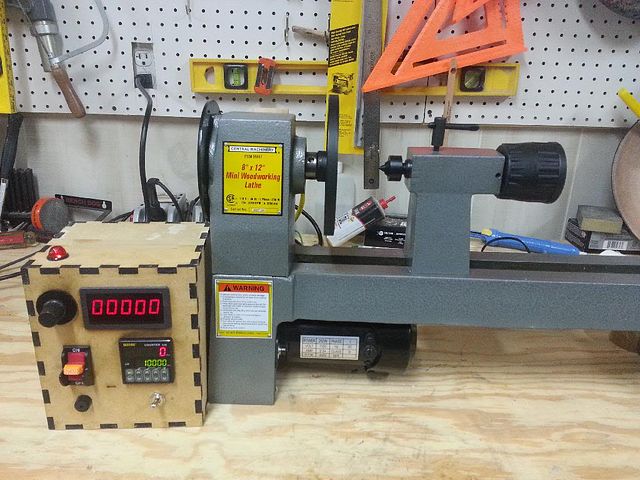
Most parts can be sourced from Ebay or Amazon (Ebay turned out to be cheaper); just search these descriptions –
Tachometer - 0.56" DIGITAL Red LED Frequency and Tachometer Rotate Speed Meter DC 7-12V
Preset Counter C3E-R-220 - 110V 220V 6 Preset Digital counter 10KPCS Relay
(get the 110v - 220v relay version, 12v - 24v version will require an additional 12v power supply)
From Radio Shack - DPDT center OFF switch
This source is just for convenience, just get a DPDT center off switch with spade logs.
Neon Lamp
Again, get what you want, 120V will be the easiest to use.
The following parts are from www.sparkfun.com
Photo Interrupter GP1A57HRJ00F Breakout Board
Photo Interrupter GP1A57HRJ00F
Resistor 330 Ohm 1/6th Watt PTHFor those who would like to make the winder but might have trouble making the opto interrupter disk... here's the file in a format ponoko.com likes. Just upload it to them and they'll cut you one.
Their current pricing to make if for you is $5.33, so not bad at all. Make sure to specify these options -
Acrylic - Black
3.0 mm
P1 - 181.0 mm long x 181.0 mm wide
Making: $1.83
Material: $3.50
Total: $5.33Schematic and control circuit - click top open the PDF
Theory of operation
My design relies on a latching circuit for basic operation – so here’s how that works…
Here’s an animation I did to illustrate the basics of a latching circuit – you’ll find that this is directly relatable to the schematic posted above.
 S1 is a momentary action switch, so it returns to it's original position after you press it, but while pressed, this is what the circuit looks like... S1 is pressed and latches the upper portion of the relay, both armatures move as one and the lower armature circuit completes the circuit between the motor and it's power supply, and the motor begins to run.
 S1 is released, and through the nature of the circuit, the relay remains "Latched". The coil is still conducting and pulling both of the armatures into a closed condition and the motor and it's power supply are still bridged so the motor continues to run.
  The momentary switch labeled S2 in this schematic represents the "normally closed" outputs of the counter's relay. Imagine that you have the counter set to spin until it reaches 10,000 winds and it gets there. The Normally closed contacts on the counters relay open, thus breaking the electron flow through the coil, thereby releasing the armatures, severing the circuit between the motor and it's power supply and the motor stops spinning. The circuit is now in a rest state and "unlatched". The circuit is reset and made ready to run again when you press the reset key on the counter, thereby closing S2.
 As a bonus, this basic idea can be retrofitted to Schatten and most Schatten based designs as well… It will almost certainly retrofit most DIY winder designs with minimal tweaking. Why? Because all it has to do is interrupt the voltage going to your winder’s motor, either directly or through an inhibit signal. Here’s what that schematic looks like –

Interfacing with the Harbor Freight lathe –
 This is the motor control board for the Harbor Freight 8x12 wood lathe and probably several others.....
Here's how everything works -
DC out - motor for the lathe
AC in - AC input from wall (mains)
Potentiometer - (controls lathe min-max speed)
Inhibit - what we're using to stop the motor at the specified number of turns. Most commercial DC motor controllers have some variation on this theme... some provide braking and others, like this one, kill the DC voltage going to the motor. Other variations of lathes use this input for a type of safety circuit or to make sure chip guards are in place.
For some unknown reason of applied goofiness in engineering, on this lathe, this line was attached to a momentary push button switch labeled "circuit breaker reset"... whatever.
*** In this design, it's now connected to the "Normally Open" outputs on the counter module - when those outputs close when the preset count is reached, the motor controller shuts off. ***
As for the High and low speed adjustments, they do exactly what they sound like :-) - adjust the lower one to have the motor start at 0 RPM's instead of a "really not appropriate for this application" 750 RPM.Opto interrupter disk and opto interrupter for counting winds
Here's a view of the left side of the lathe with the plastic bell housing removed showing the opto interrupter disk I cut and the assembly steps –
Spindle assembly ready for optical interrupter instillation (remove the plastic bell housing and the outer most jam nut) -
 Place spacer on spindle shaft (I laser cut this spacer, but you could stack washers to achieve the same effect) -
 Spindle assembly ready to go with the new opto interrupter disk and outer jam nut installed – you need 2 windows on the disk and it needs to be well balanced, 3000 RPM is unforgiving in this area.
 Under power at 3200 RPM – smooth as silk.
 This photo shows the opto interrupter on the top of the lathe – it just attaches with a magnet and hangs over the disk. I’ll take better pics of this area as soon as I get a chance.
Wire Guides and winding bar
Added a wire guide bar - 10mm (what I had on hand).
This photo shows the opto interrupter on the top of the lathe – it just attaches with a magnet and hangs over the disk. I’ll take better pics of this area as soon as I get a chance.
 The wire guides are 10mm ID ball bearings held in place and adjusted by magnets (way easier to adjust position then using set screws).
 I've tried to be very detailed and I hope everything is as clear as mud :-) Happy to clear up any questions -


-
-
That's pretty amazing... please post this as a blog and tag it up so people can find it easily in future.
Good on you for sharing under CC.
-
-
Thank you! The CC is the way to go.. it's way more fun when everyone can play and benefit. I did a blog post, not sure how to tag it though -
-
-
Yep, if only everyone thought like that...
You can add tags at the bottom of the blog post
-
Permalink Reply by Suspect Device on
-
Whoa. This is lots of great info. Thanks for sharing this! Those little 3-string pups are pretty sharp too!
-
-
Thank you; happy to share. Those 3 string PUP's were actually for a prototype 6 string split coil humbucker - my homebrew version of a Supro lapsteel string through design. Looks like a Coodercaster pickup. They'd work for a 3 string CBG as well I'd imagine. They're tele width, so fairly wide and each one has 11K winds.
You have to make a cleat to mount them on the lathe winder... I need to post up a pic of that setup.
The Essential Pages
Recommended Links & Resources
- CigarBoxGuitar.com - the knowledgebase of the homemade music movement.
- Cigar Box Music - How-to-Build CBGs DVDs, How to Play CBG and more!
- 3-String-Guitar.com - John "Red Dog" McNair's unique take on cigar box guitars and their history - lots of historic photos!
- The Cigar Box Guitar Manifesto - the mission statement and rallying cry for the Cigar Box Guitar Revolution.
Forum
Are metal frets necessary?
Started by J. D. Woods in Performances, How to Play, Lessons, Concerts. Last reply by BrianQ. 1 hour ago. 4 Replies 1 Like
UK - Best Place to Buy Cigar Box's
Started by Rich Butters in Building Secrets, Tips, Advice, Discussion. Last reply by BrianQ. 9 hours ago. 2 Replies 0 Likes
Busking Songs...
Started by Nomad Jack in Performances, How to Play, Lessons, Concerts. Last reply by J. D. Woods on Wednesday. 7 Replies 2 Likes
Joseph J. Rogowski about Current Based Pickup Design
Started by Moritz Voegeli in Building Secrets, Tips, Advice, Discussion. Last reply by Southern Ray on Monday. 6 Replies 2 Likes
crossover guitar.
Started by Timothy Hunter in Other stuff - off topic, fun stuff, whatever. Last reply by Timothy Hunter Apr 10. 14 Replies 3 Likes
Flat bucker under box top. Any Success?
Started by Tom T in Building Secrets, Tips, Advice, Discussion. Last reply by Southern Ray Apr 9. 9 Replies 0 Likes
Has anyone tried this? Thoughts?
Started by Southern Ray in Building Secrets, Tips, Advice, Discussion. Last reply by Southern Ray Apr 4. 7 Replies 1 Like
just came accross this pickup idea on youtube.
Started by Timothy Hunter in Building Secrets, Tips, Advice, Discussion. Last reply by Southern Ray Mar 27. 1 Reply 2 Likes
VIDEO: Building a CBG with limited resources.
Started by Taffy Evans in Building Secrets, Tips, Advice, Discussion. Last reply by Southern Ray Mar 10. 1 Reply 3 Likes
Free PDF Download: Vintage Guitar Effects Plans - 1967 Fuzzbox and 1969 Treble Boost
Started by Cigar Box Nation in Feature Articles. Last reply by BrianQ. Mar 9. 4 Replies 3 Likes
Tune up songs
Started by Ghostbuttons in Building Secrets, Tips, Advice, Discussion. Last reply by Timothy Hunter Mar 9. 5 Replies 1 Like
Duel output jacks
Started by Justin Stanchfield in Building Secrets, Tips, Advice, Discussion. Last reply by Taffy Evans Mar 8. 6 Replies 0 Likes
No Harmonics
Started by Ken I in Building Secrets, Tips, Advice, Discussion. Last reply by Brian partington Mar 8. 8 Replies 0 Likes
Camera suggestions?
Started by Southern Ray in Cool gear discussion - that's not cigar box related. Last reply by Southern Ray Mar 6. 5 Replies 0 Likes
CBG site issues, continued.
Started by Taffy Evans in Other stuff - off topic, fun stuff, whatever. Last reply by Taffy Evans Mar 5. 4 Replies 2 Likes
Anyone used a violin-style tailpiece on a CBG?
Started by Justin Stanchfield in Building Secrets, Tips, Advice, Discussion. Last reply by Carl Floyd Mar 1. 15 Replies 0 Likes
Guitar for the grandson
Started by Joe in Performances, How to Play, Lessons, Concerts. Last reply by Carl Floyd Feb 29. 13 Replies 0 Likes
Building with vintage paper/pressed board cigar boxes.
Started by Chance in Building Secrets, Tips, Advice, Discussion. Last reply by Southern Ray Feb 22. 12 Replies 1 Like
How to Get Your Own Music on Spotify
Started by Cigar Box Nation in Feature Articles. Last reply by Southern Ray Feb 21. 2 Replies 4 Likes
Trash Canjo
Started by Brad in Cool gear discussion - that's not cigar box related. Last reply by Southern Ray Feb 19. 6 Replies 3 Likes
Blog Posts
I'll be fashionable this summer =)
Posted by Vlad on March 31, 2024 at 11:48pm 0 Comments 1 Like
Everyone can make CBG. And I did it =)
Posted by Vlad on March 6, 2024 at 2:32am 5 Comments 2 Likes
.✨. Cover Me ..♪♫•*¨*•. ~ the Delta Blues Outlaws
Posted by billy jones bluez on February 28, 2024 at 2:09pm 0 Comments 0 Likes
Q&A with Arkansas-based talented blues musician Billy Jones, one of the very best authentic modern artists
Posted by billy jones bluez on February 17, 2024 at 11:00pm 0 Comments 0 Likes
Big Power Bank for Small CBG =)
Posted by Vlad on February 11, 2024 at 1:06am 1 Comment 1 Like
Latest Activity
Frethound 4 String
CigarBoxGuitar.com Knowledgebase Articles
Events
-
Republic of Texas CBG Festival (8th Annual)
May 11, 2024 from 11am to 8pm – Speakeasy Grill
0 Comments 0 Likes
Music
© 2024 Created by Ben "C. B. Gitty" Baker.
Powered by
![]()